Managing KubeVirt with OpenShift Web Console
In the previous post, KubeVirt user interface options were described and showed some features, pros and cons of using OKD console to manage our KubeVirt deployment. This blog post will focus on installing and running the OKD web console in a Kubernetes cluster so that it can leverage the deep integrations between KubeVirt and the OKD web console.
There are two options to run the OKD web console to manage a Kubernetes cluster:
-
Executing the web console as a binary. This installation method is the only one described in the OKD web console repository. Personally, looks like more targetted at developers who want to quickly iterate over the development process while hacking in the web console. This development approach is described in the native Kubernetes section of the OpenShift console code repository.
-
Executing the web console as another pod. The idea is leveraging the containerized version available as origin-console in the OpenShift container image repository and execute it inside a Kubernetes cluster as a regular application, e.g. as a pod.
What is the OKD web console
The OKD web console is a user interface accessible from a web browser. Developers can use the web console to visualize, browse, and manage the contents of namespaces. It is also referred as a more friendly
kubectlin the form of a single page web application. It integrates with other services like monitoring, chargeback and the Operator Lifecycle Manager or OLM. Some things that go on behind the scenes include:
- Proxying the Kubernetes API under /api/kubernetes
- Providing additional non-Kubernetes APIs for interacting with the cluster
- Serving all frontend static assets
- User Authentication
As it is stated in the official GitHub’s repository, the OKD web console runs as a binary listening in a local port. The static assets required to run the web console are served by the binary itself. It is possible to customize the web console using extensions. The extensions have to be committed to be to the sources of the console directly.
When the web console is accessed from a browser, it first loads all required static assets. Then makes requests to the Kubernetes API using the values defined as environment variables in the host where the console is running. Actually, there is a script called environment.sh that helps exporting the proper values for these environment variables.
The web console uses WebSockets to maintain a persistent connection with the API server and receive updated information as soon as it is available. Note as well that JavaScript must be enabled to use the web console. For the best experience, use a web browser that supports WebSockets. OKD web console’s developers inform that Google Chrome/Chromium version 76 or greater is used in their integration tests.
Unlike what is explained in the official repository, OKD actually executes the OKD web console in a pod. Therefore, even not officially mentioned, information how to run the OKD web console as a pod in a native Kubernetes cluster will be described later.
Binary installation
This method is suggested to be a development installation since it is mainly used by the OKD web console developers to test new features.
In this section the OKD web console will be compiled from the source code and executed as a binary artifact in a CentOS 8 server which does not belong to any Kubernetes cluster. The following diagram shows the relationship between all the components: user, OKD web console and Kubernetes cluster.
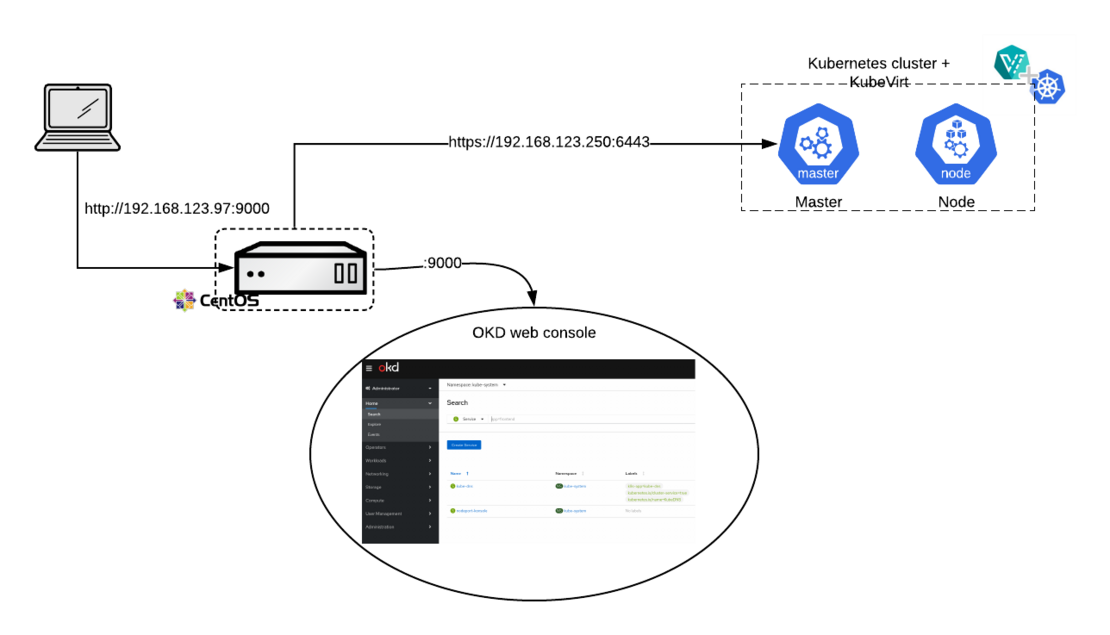
Note that it is possible to run the OKD web console in a Kubernetes master, in a regular node or, as shown, in a server outside the cluster. In the latter case, the external server must have access to the master API. Notice also that it can be configured with different security and network settings or even different hardware resources.
The first step when using the binary installation is cloning the repository.
Dependencies
Below are detailed the dependencies needed to compile the OKD web console artifact:
- Operating System. CentOS 8 was chosen as our operating system for the server running the OKD web console. Kubernetes cluster is running latest CentOS 7.
$ cat /etc/redhat-release
CentOS Linux release 8.0.1905 (Core)
- Kubernetes. It has been deployed the latest available version at the moment of writing:
v1.17. Kubernetes cluster is comprised by one master node and one regular node with enough CPU (4vCPUs) and memory (16Gi) to run KubeVirt and a couple of KubeVirt’sVirtualMachineInstances. No extra storage was needed since the virtual machines will run as container-disk instances.
$ kubectl get nodes -o wide
NAME                            STATUS   ROLES    AGE   VERSION   INTERNAL-IP       EXTERNAL-IP   OS-IMAGE                KERNEL-VERSION               CONTAINER-RUNTIME
blog-master-00.kubevirt.local   Ready    master   29h   v1.17.0   192.168.123.250   <none>        CentOS Linux 7 (Core)   3.10.0-957.27.2.el7.x86_64   docker://1.13.1
blog-worker-00.kubevirt.local   Ready    <none>   29h   v1.17.0   192.168.123.232   <none>        CentOS Linux 7 (Core)   3.10.0-957.27.2.el7.x86_64   docker://1.13.1
- Node.js >= 8. Node.js 10 is available as an AppStream module.
$ sudo yum module install nodejs
Installed:
  nodejs-1:10.16.3-2.module_el8.0.0+186+542b25fc.x86_64   npm-1:6.9.0-1.10.16.3.2.module_el8.0.0+186+542b25fc.x86_64

Complete!
- yarn >= 1.3.2. Yarn is a dependency of Node.js. In this case, the official yarn repository has to be added as a local repositories.
$ sudo curl --silent --location https://dl.yarnpkg.com/rpm/yarn.repo | sudo tee /etc/yum.repos.d/yarn.repo
$ sudo rpm --import https://dl.yarnpkg.com/rpm/pubkey.gpg
$ sudo yum install yarn

$ yarn --version
1.21.1
- go >= 1.11+. Golang is available as an AppStream module in CentOS 8:
$ sudo yum module install go-toolset

Installed:
  golang-1.11.6-1.module_el8.0.0+192+8b12aa21.x86_64
- jq (for contrib/environment.sh). Finally, jq is installed in order to work with JSON data.
$ yum install jq

Installed:
  jq.x86_64 0:1.5-1.el7
Compiling OKD web console
Once all dependencies are met, access the cloned directory and export the correct variables that will be used during the building process. Then, execute build.sh script which actually calls the build-frontend and build-backend scripts.
$ git clone https://github.com/openshift/console.git
$ cd console/
$ export KUBECONFIG=~/.kube/config
$ source ./contrib/environment.sh
Using https://192.168.123.250:6443

$ ./build.sh
...
Done in 215.91s.
The result of the process is a binary file called bridge inside the bin folder. Prior to run the “bridge”, it has to be verified that the port where the OKD web console is expecting connections is not blocked.
iptables -A INPUT -p tcp --dport 9000 -m conntrack --ctstate NEW,ESTABLISHED -j ACCEPT
Then, the artifact can be executed:
$ ./bin/bridge
2020/01/7 10:21:17 cmd/main: cookies are not secure because base-address is not https!
2020/01/7 10:21:17 cmd/main: running with AUTHENTICATION DISABLED!
2020/01/7 10:21:17 cmd/main: Binding to 0.0.0.0:9000...
2020/01/7 10:21:17 cmd/main: not using TLS
At this point, the connection to the OKD web console from your network should be established successfully. Note that by default there is no authentication required to login into the console and the connection is using HTTP protocol. There are variables in the environment.sh file that can change this default behaviour.
Probably, the following issue will be faced when connecting to the web user interface: "services is forbidden: User "system:serviceaccount:kube-system:default" cannot list resource "services" in API group "" in the namespace default". The problem is that the default service account does not have enough privileges to show all the cluster objects.
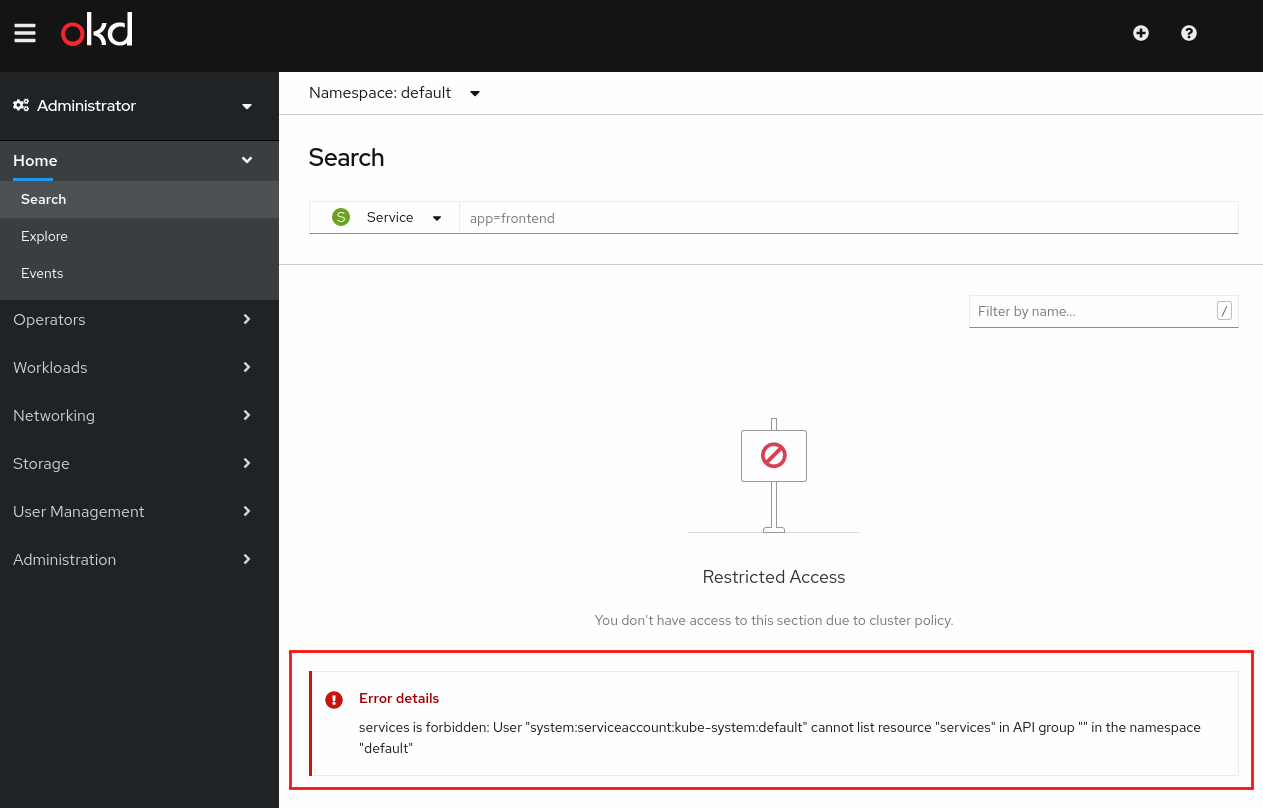
There are two options to fix the issue: one is granting cluster-admin permissions to the default service account. That, it is not recommended since default service account is, at its very name indicates, the default service account for all pods if not explicitly configured. This means granting cluster-admin permissions to some applications running in kube-system namespace and even future ones when no service account is configured.
The other option is create a new service account called console, grant cluster-admin permissions to it and configure the web console to run with this new service account:
kubectl create serviceaccount console -n kube-system
kubectl create clusterrolebinding console --clusterrole=cluster-admin --serviceaccount=kube-system:console -n kube-system
Once created, modify the environment.sh file and change the line that starts with secretname as shown below:
vim contrib/environment.sh
secretname=$(kubectl get serviceaccount **console** --namespace=kube-system -o jsonpath='{.secrets[0].name}')
Now, variables configured in the environment.sh file have to be exported again and the connection to the console must be reloaded.
source ./contrib/environment.sh
Deploy KubeVirt using the Hyperconverged Cluster Operator (HCO)
In order to ease the installation of KubeVirt, the unified operator called HCO will be deployed. The goal of the hyperconverged-cluster-operator (HCO) is to provide a single entrypoint for multiple operators - kubevirt, cdi, networking, etc… - where users can deploy and configure them in a single object.
This operator is sometimes referred to as a “meta operator” or an “operator for operators”. Most importantly, this operator doesn’t replace or interfere with OLM. It only creates operator CRs, which is the user’s prerogative. More information about HCO can be found in the post published in this blog by Ryan Hallisey: Hyper Converged Operator on OCP 4 and K8s(HCO).
The HCO repository provides plenty of information on how to install the operator. In this lab, it has been installed as Using the HCO without OLM or Marketplace, which basically executes this deployment script:
$ curl https://raw.githubusercontent.com/kubevirt/hyperconverged-cluster-operator/main/deploy/deploy.sh | bash
+ kubectl create ns kubevirt-hyperconverged
namespace/kubevirt-hyperconverged created
+ namespaces=("openshift")
+ for namespace in ${namespaces[@]}
++ kubectl get ns openshift
Error from server (NotFound): namespaces "openshift" not found
+ [[ '' == '' ]]
+ kubectl create ns openshift
namespace/openshift created
++ kubectl config current-context
+ kubectl config set-context kubernetes-admin@kubernetes --namespace=kubevirt-hyperconverged
Context "kubernetes-admin@kubernetes" modified.
+ kubectl create -f https://raw.githubusercontent.com/kubevirt/hyperconverged-cluster-operator/main/deploy/crds/cluster-network-addons00.crd.yaml
customresourcedefinition.apiextensions.k8s.io/networkaddonsconfigs.networkaddonsoperator.network.kubevirt.io created
+ kubectl create -f https://raw.githubusercontent.com/kubevirt/hyperconverged-cluster-operator/main/deploy/crds/containerized-data-importer00.crd.yaml
customresourcedefinition.apiextensions.k8s.io/cdis.cdi.kubevirt.io created
+ kubectl create -f https://raw.githubusercontent.com/kubevirt/hyperconverged-cluster-operator/main/deploy/crds/hco.crd.yaml
customresourcedefinition.apiextensions.k8s.io/hyperconvergeds.hco.kubevirt.io created
+ kubectl create -f https://raw.githubusercontent.com/kubevirt/hyperconverged-cluster-operator/main/deploy/crds/kubevirt00.crd.yaml
customresourcedefinition.apiextensions.k8s.io/kubevirts.kubevirt.io created
+ kubectl create -f https://raw.githubusercontent.com/kubevirt/hyperconverged-cluster-operator/main/deploy/crds/node-maintenance00.crd.yaml
customresourcedefinition.apiextensions.k8s.io/nodemaintenances.kubevirt.io created
+ kubectl create -f https://raw.githubusercontent.com/kubevirt/hyperconverged-cluster-operator/main/deploy/crds/scheduling-scale-performance00.crd.yaml
customresourcedefinition.apiextensions.k8s.io/kubevirtcommontemplatesbundles.kubevirt.io created
+ kubectl create -f https://raw.githubusercontent.com/kubevirt/hyperconverged-cluster-operator/main/deploy/crds/scheduling-scale-performance01.crd.yaml
customresourcedefinition.apiextensions.k8s.io/kubevirtmetricsaggregations.kubevirt.io created
+ kubectl create -f https://raw.githubusercontent.com/kubevirt/hyperconverged-cluster-operator/main/deploy/crds/scheduling-scale-performance02.crd.yaml
customresourcedefinition.apiextensions.k8s.io/kubevirtnodelabellerbundles.kubevirt.io created
+ kubectl create -f https://raw.githubusercontent.com/kubevirt/hyperconverged-cluster-operator/main/deploy/crds/scheduling-scale-performance03.crd.yaml
customresourcedefinition.apiextensions.k8s.io/kubevirttemplatevalidators.kubevirt.io created
+ kubectl create -f https://raw.githubusercontent.com/kubevirt/hyperconverged-cluster-operator/main/deploy/crds/v2vvmware.crd.yaml
customresourcedefinition.apiextensions.k8s.io/v2vvmwares.kubevirt.io created
+ kubectl create -f https://raw.githubusercontent.com/kubevirt/hyperconverged-cluster-operator/main/deploy/cluster_role.yaml
role.rbac.authorization.k8s.io/cluster-network-addons-operator created
clusterrole.rbac.authorization.k8s.io/hyperconverged-cluster-operator created
clusterrole.rbac.authorization.k8s.io/cluster-network-addons-operator created
clusterrole.rbac.authorization.k8s.io/kubevirt-operator created
clusterrole.rbac.authorization.k8s.io/kubevirt-ssp-operator created
clusterrole.rbac.authorization.k8s.io/cdi-operator created
clusterrole.rbac.authorization.k8s.io/node-maintenance-operator created
+ kubectl create -f https://raw.githubusercontent.com/kubevirt/hyperconverged-cluster-operator/main/deploy/service_account.yaml
serviceaccount/cdi-operator created
serviceaccount/cluster-network-addons-operator created
serviceaccount/hyperconverged-cluster-operator created
serviceaccount/kubevirt-operator created
serviceaccount/kubevirt-ssp-operator created
serviceaccount/node-maintenance-operator created
+ kubectl create -f https://raw.githubusercontent.com/kubevirt/hyperconverged-cluster-operator/main/deploy/cluster_role_binding.yaml
rolebinding.rbac.authorization.k8s.io/cluster-network-addons-operator created
clusterrolebinding.rbac.authorization.k8s.io/hyperconverged-cluster-operator created
clusterrolebinding.rbac.authorization.k8s.io/cluster-network-addons-operator created
clusterrolebinding.rbac.authorization.k8s.io/kubevirt-operator created
clusterrolebinding.rbac.authorization.k8s.io/kubevirt-ssp-operator created
clusterrolebinding.rbac.authorization.k8s.io/cdi-operator created
clusterrolebinding.rbac.authorization.k8s.io/node-maintenance-operator created
+ kubectl create -f https://raw.githubusercontent.com/kubevirt/hyperconverged-cluster-operator/main/deploy/operator.yaml
deployment.apps/hyperconverged-cluster-operator created
deployment.apps/cluster-network-addons-operator created
deployment.apps/virt-operator created
deployment.apps/kubevirt-ssp-operator created
deployment.apps/cdi-operator created
deployment.apps/node-maintenance-operator created
+ kubectl create -f https://raw.githubusercontent.com/kubevirt/hyperconverged-cluster-operator/main/deploy/hco.cr.yaml
hyperconverged.hco.kubevirt.io/hyperconverged-cluster created
The result is a new namespace called kubevirt-hyperconverged with all the operators, Custom Resources (CRs) and objects needed by KubeVirt:
$ kubectl get pods -n kubevirt-hyperconverged -o wide
NAME                                                  READY   STATUS    RESTARTS   AGE   IP                NODE                            NOMINATED NODE   READINESS GATES
bridge-marker-bwq6f                                   1/1     Running   0          12m   192.168.123.250   blog-master-00.kubevirt.local   <none>           <none>
bridge-marker-st7f7                                   1/1     Running   0          12m   192.168.123.232   blog-worker-00.kubevirt.local   <none>           <none>
cdi-apiserver-6f59996849-2hmm9                        1/1     Running   0          12m   10.244.1.17       blog-worker-00.kubevirt.local   <none>           <none>
cdi-deployment-57c68dbddc-c4n8l                       1/1     Running   0          12m   10.244.1.22       blog-worker-00.kubevirt.local   <none>           <none>
cdi-operator-64bbf595c-48v7k                          1/1     Running   1          24m   10.244.1.12       blog-worker-00.kubevirt.local   <none>           <none>
cdi-uploadproxy-5cbf6f4897-95fn5                      1/1     Running   0          12m   10.244.1.16       blog-worker-00.kubevirt.local   <none>           <none>
cluster-network-addons-operator-5956598648-5r79l      1/1     Running   0          24m   10.244.1.10       blog-worker-00.kubevirt.local   <none>           <none>
hyperconverged-cluster-operator-d567b5dd8-7d8wq       0/1     Running   0          24m   10.244.1.9        blog-worker-00.kubevirt.local   <none>           <none>
kube-cni-linux-bridge-plugin-kljvq                    1/1     Running   0          12m   10.244.1.19       blog-worker-00.kubevirt.local   <none>           <none>
kube-cni-linux-bridge-plugin-p6dkz                    1/1     Running   0          12m   10.244.0.7        blog-master-00.kubevirt.local   <none>           <none>
kube-multus-ds-amd64-84gcj                            1/1     Running   1          12m   10.244.1.23       blog-worker-00.kubevirt.local   <none>           <none>
kube-multus-ds-amd64-flq8s                            1/1     Running   2          12m   10.244.0.10       blog-master-00.kubevirt.local   <none>           <none>
kubemacpool-mac-controller-manager-675ff47587-pb57c   1/1     Running   0          11m   10.244.1.20       blog-worker-00.kubevirt.local   <none>           <none>
kubemacpool-mac-controller-manager-675ff47587-rf65j   1/1     Running   0          11m   10.244.0.8        blog-master-00.kubevirt.local   <none>           <none>
kubevirt-ssp-operator-7b5dcb45c4-qd54h                1/1     Running   0          24m   10.244.1.11       blog-worker-00.kubevirt.local   <none>           <none>
nmstate-handler-8r6d5                                 1/1     Running   0          11m   192.168.123.232   blog-worker-00.kubevirt.local   <none>           <none>
nmstate-handler-cq5vs                                 1/1     Running   0          11m   192.168.123.250   blog-master-00.kubevirt.local   <none>           <none>
node-maintenance-operator-7f8f78c556-q6flt            1/1     Running   0          24m   10.244.0.5        blog-master-00.kubevirt.local   <none>           <none>
ovs-cni-amd64-4z2qt                                   2/2     Running   0          11m   192.168.123.250   blog-master-00.kubevirt.local   <none>           <none>
ovs-cni-amd64-w8fzj                                   2/2     Running   0          11m   192.168.123.232   blog-worker-00.kubevirt.local   <none>           <none>
virt-api-7b7d486d88-hg4rd                             1/1     Running   0          11m   10.244.1.21       blog-worker-00.kubevirt.local   <none>           <none>
virt-api-7b7d486d88-r9s2d                             1/1     Running   0          11m   10.244.0.9        blog-master-00.kubevirt.local   <none>           <none>
virt-controller-754466fb86-js6r7                      1/1     Running   0          10m   10.244.1.25       blog-worker-00.kubevirt.local   <none>           <none>
virt-controller-754466fb86-mcxwd                      1/1     Running   0          10m   10.244.0.11       blog-master-00.kubevirt.local   <none>           <none>
virt-handler-cz7q2                                    1/1     Running   0          10m   10.244.0.12       blog-master-00.kubevirt.local   <none>           <none>
virt-handler-k6npr                                    1/1     Running   0          10m   10.244.1.24       blog-worker-00.kubevirt.local   <none>           <none>
virt-operator-84f5588df6-2k49b                        1/1     Running   0          24m   10.244.1.14       blog-worker-00.kubevirt.local   <none>           <none>
virt-operator-84f5588df6-zzrsb                        1/1     Running   1          24m   10.244.0.4        blog-master-00.kubevirt.local   <none>           <none>
Note
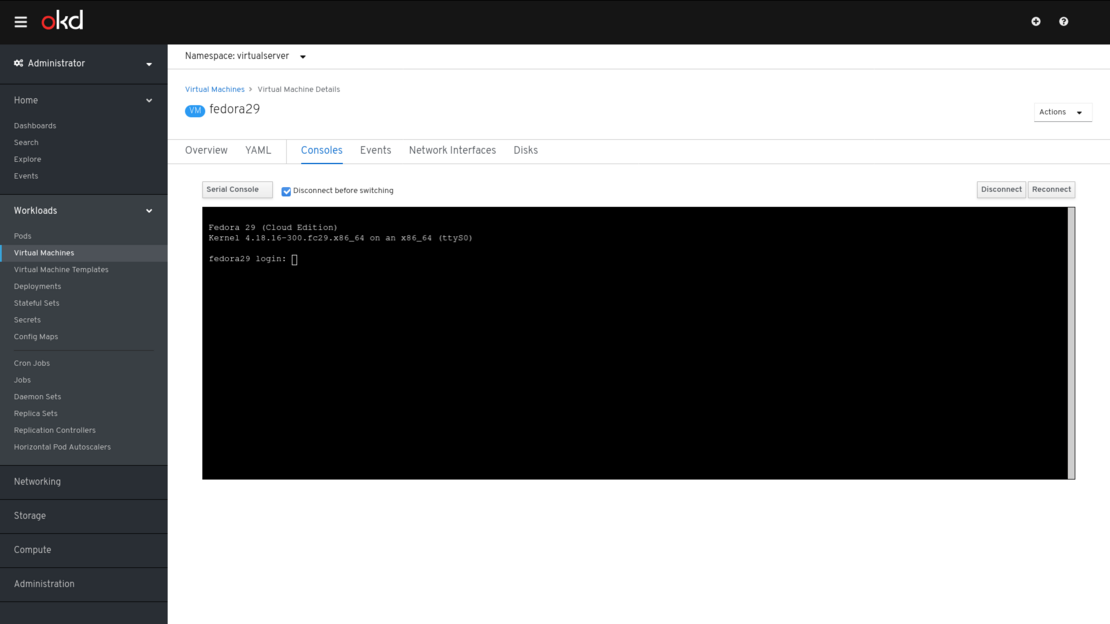
Only once HCO is completely deployed, VirtualMachines can be managed from the web console. This is because the web console is shipped with an specific plugin that detects a KubeVirt installation by the presence of KubeVirt Custom Resource Definition (CRDs) in the cluster. Once detected, it automatically shows a new option under the Workload left pane menu to manage KubeVirt resources.
It is worth noting that there is an ongoing effort to adapt the OpenShift web console’s user interface in native Kubernetes additionally to OKD or OpenShift as they are expected. As an example, a few days ago, the non applicable Virtual Machine Templates option from the Workload menu was removed and the VM Wizard was made fully functional when native Kubernetes is detected.
Containerized installation
The OKD web console actually runs as a pod in OKD along with its deployment, services and all objects needed to run properly. The idea is to take advantage of the containerized OKD web console available and execute it in one of the nodes of a native Kubernetes cluster.
Note that unlike the binary installation the pod must run in a node inside our Kubernetes cluster
Running the OKD web console as a native Kubernetes application will benefit from all the Kubernetes advantages: rolling deployments, easy upgrades, high availability, scalability, auto-restart in case of failure, liveness and readiness probes… An example of how easy it is to update the OKD web console to a newer version will be presented as well.
Deploying OKD web console
In order to configure the deployment of the OKD web console the proper Kubernetes objects have to be created. As shown in the previously Compiling OKD web console there are quite a few environment variables that needs to be set. When dealing with Kubernetes objects these variables should be included in the deployment object.
A YAML file containing a deployment and service objects that mimic the binary installation is already prepared. It can be downloaded from here and configured depending on the user’s local installation.
Then, create a specific service account (console) for running the OpenShift web console in case it is not created previously and grant cluster-admin permissions:
kubectl create serviceaccount console -n kube-system
kubectl create clusterrolebinding console --clusterrole=cluster-admin --serviceaccount=kube-system:console -n kube-system
Next, extract the token secret name associated with the console service account:
$ kubectl get serviceaccount console --namespace=kube-system -o jsonpath='{.secrets[0].name}'
console-token-ppfc2
Finally, the downloaded YAML file must be modified assigning the proper values to the token section. The following command may help to extract the token name from the user console, which is a user created by
apiVersion: apps/v1
kind: Deployment
metadata:
  name: console-deployment
  namespace: kube-system
  labels:
    app: console
spec:
  replicas: 1
  selector:
    matchLabels:
      app: console
  template:
    metadata:
      labels:
        app: console
    spec:
      containers:
        - name: console-app
          image: quay.io/openshift/origin-console:4.2
          env:
            - name: BRIDGE_USER_AUTH
              value: disabled # no authentication required
            - name: BRIDGE_K8S_MODE
              value: off-cluster
            - name: BRIDGE_K8S_MODE_OFF_CLUSTER_ENDPOINT
              value: https://kubernetes.default #master api
            - name: BRIDGE_K8S_MODE_OFF_CLUSTER_SKIP_VERIFY_TLS
              value: "true" # no tls enabled
            - name: BRIDGE_K8S_AUTH
              value: bearer-token
            - name: BRIDGE_K8S_AUTH_BEARER_TOKEN
              valueFrom:
                secretKeyRef:
                  name: console-token-ppfc2 # console serviceaccount token
                  key: token

---
kind: Service
apiVersion: v1
metadata:
  name: console-np-service
  namespace: kube-system
spec:
  selector:
    app: console
  type: NodePort # nodePort configuration
  ports:
    - name: http
      port: 9000
      targetPort: 9000
      nodePort: 30036
      protocol: TCP

---
Finally, the deployment and service objects can be created. The deployment will trigger the download and installation of the OKD web console image.
$ kubectl create -f okd-web-console-install.yaml
deployment.apps/console-deployment created
service/console-service created

$ kubectl get pods -o wide -n kube-system
NAME                                                    READY   STATUS    RESTARTS   AGE     IP                NODE                            NOMINATED NODE   READINESS GATES
console-deployment-59d8956db5-td462                     1/1     Running   0          4m49s   10.244.0.13       blog-master-00.kubevirt.local   <none>           <none>

$ kubectl get svc -o wide -n kube-system
NAME                 TYPE        CLUSTER-IP     EXTERNAL-IP   PORT(S)                  AGE
console-np-service   NodePort    10.96.195.45   <none>        9000:30036/TCP           19m
kube-dns             ClusterIP   10.96.0.10     <none>        53/UDP,53/TCP,9153/TCP   20d
Once running, a connection to the nodeport defined in the service object can be established. It can be checked that the OKD web console is up and running version 4.2.
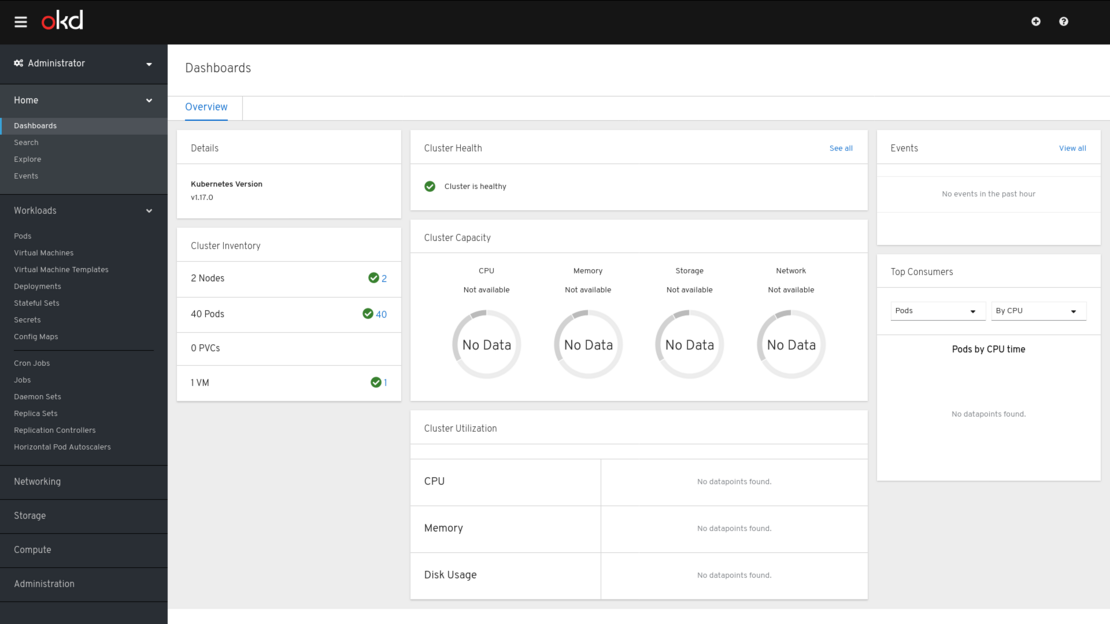
It can be verified that it is possible to see and manage VirtualMachines running inside of the native Kubernetes cluster.
Upgrade OKD web console
The upgrade process is really straightforward. All available image versions of the OpenShift console can be consulted in the official OpenShift container image repository. Then, the deployment object must be modified accordingly to run the desired version of the OKD web console.
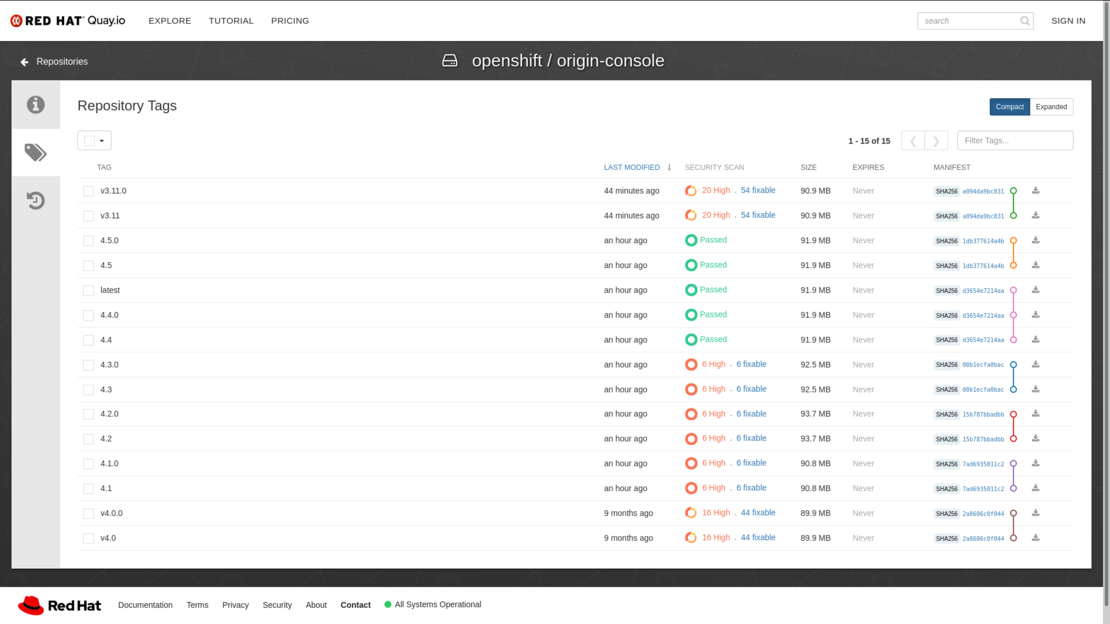
In this case, the we console will be updated to the newest version, which is 4.5.0/4.5. Note that this is not linked with the latest tag, actually latest tag is the same as version 4.4. Upgrading process only involves updating the image value to the desired container image: quay.io/openshift/origin-console:4.5 and save.
apiVersion: apps/v1
kind: Deployment
metadata:
  name: console-deployment
  namespace: kube-system
  labels:
    app: console
spec:
  replicas: 1
  selector:
    matchLabels:
      app: console
  template:
    metadata:
      labels:
        app: console
    spec:
      containers:
        - name: console-app
          image: quay.io/openshift/origin-console:4.5 #new image version
          env:
            - name: BRIDGE_USER_AUTH
              value: disabled
            - name: BRIDGE_K8S_MODE
              value: off-cluster
            - name: BRIDGE_K8S_MODE_OFF_CLUSTER_ENDPOINT
              value: https://kubernetes.default
            - name: BRIDGE_K8S_MODE_OFF_CLUSTER_SKIP_VERIFY_TLS
              value: "true"
            - name: BRIDGE_K8S_AUTH
              value: bearer-token
            - name: BRIDGE_K8S_AUTH_BEARER_TOKEN
              valueFrom:
                secretKeyRef:
                  name: console-token-ppfc2
                  key: token
Once the deployment has been saved, a new pod with the configured version of the OKD web console is created and eventually will replace the old one.
$ kubectl get pods -n kube-system
NAME                                                    READY   STATUS              RESTARTS   AGE
console-deployment-5588f98644-bw7jr                     0/1     ContainerCreating   0          5s
console-deployment-59d8956db5-td462                     1/1     Running             0          16h

In the video below, the procedure explained in this section is shown.
Summary
In this post two ways to install the OKD web console to manage a KubeVirt deployment in a native Kubernetes cluster have been explored. Running the OKD web console will allow you to create, manage and delete virtual machines running in a native cluster from a friendly user interface. Also you will be able to delegate to the developers or other users the creation and maintenance of their virtual machines without having a deep knowledge of Kubernetes.
Personally, I would like to see more user interfaces to manage and configure KubeVirt deployments and their virtual machines. In a previous post, KubeVirt user interface options, some options were explored, however only OKD web console was found to be deeply integrated with KubeVirt.
Ping us or feel free to comment this post in case there are some other existing options that we did not notice.
References
- KubeVirt user interface options
- Managing KubeVirt with OpenShift web console running as a container application on Youtube
- Managing KubeVirt with OpenShift web console running as a compiled binary on Youtube
- Kubevirt Laboratory 1 blogpost: Use Kubevirt
- KubeVirt basic operations video on Youtube
- Kubevirt installation notes
- First steps with KubeVirt - Katacoda scenario