Building VM golden images with Packer
Introduction
Creating and maintaining VM golden images can be time-consuming, often requiring local virtualization tools and manual setup. With KubeVirt running inside your Kubernetes cluster, you can manage virtual machines alongside your containers, but it lacks automation for creating consistent, reusable VM images.
That’s where Packer and the new KubeVirt plugin come in. The plugin lets you build VM images directly in Kubernetes, enabling you to automate OS installation from ISO, customize the VM during build, and produce a reusable bootable volume, all without leaving your cluster.
Prerequisites
Before you begin, make sure you have the following installed:
Plugin Features
The Packer plugin for KubeVirt offers a variety of features that simplify the VM golden image creation process:
- HCL Template: Define infrastructure as code for easy versioning and reuse using HCL templates.
- ISO Installation: Build VM golden images from an ISO file using the
kubevirt-isobuilder. - ISO Media Files: Include additional files (e.g., configs, scripts, and more) during the installation process.
- Boot Command: Automate the VM boot process via a VNC connection with a predefined set of commands.
- Integrated SSH/WinRM Access: Provision and customize VMs via SSH or WinRM.
Note: This plugin is currently in pre-release and actively under development by Red Hat and HashiCorp together.
Plugin Components
The core component of this plugin is the kubevirt-iso builder. This builder
allows you to start from an ISO file and create a VM golden image directly
on your Kubernetes cluster.
Builder Design
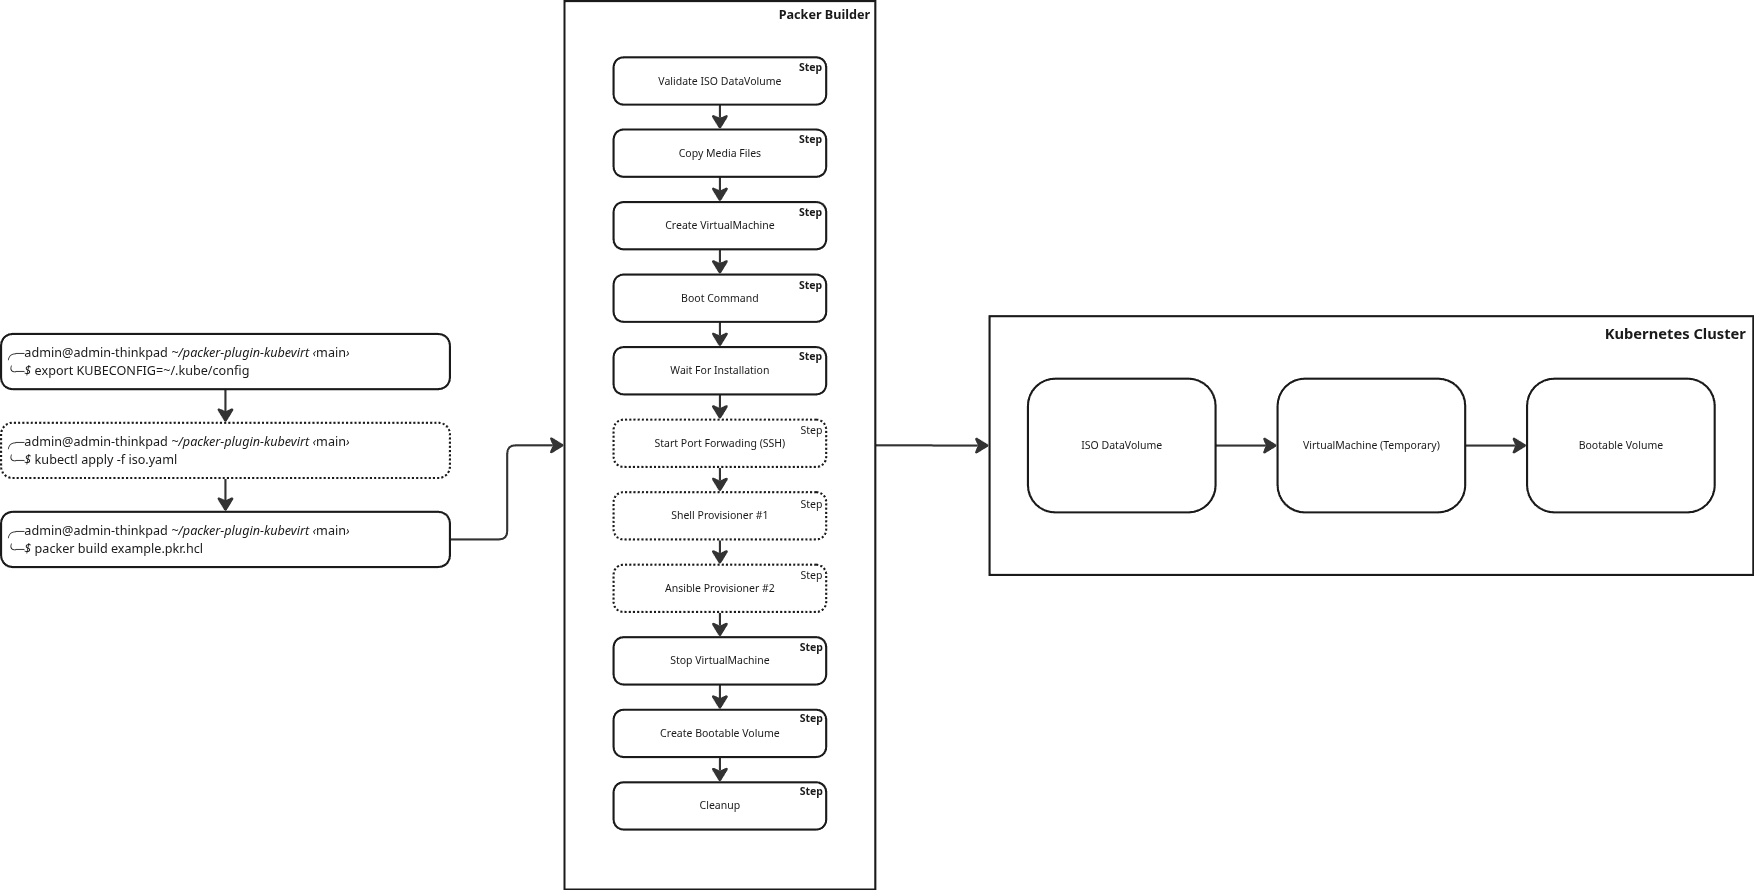
This diagram shows the workflow for building a bootable volume in a Kubernetes cluster using Packer with the KubeVirt plugin.
- Creates a temporary VM from an ISO image.
- Runs provisioning using either the Shell or Ansible provisioner.
- Clones the VM’s disk to create a reusable bootable volume (DataVolume and DataSource).
This bootable volume can then be reused to instantiate new VMs without repeating the installation.
Step-by-Step Example: Building a Fedora VM Image
The following Packer template (Fedora 42) demonstrates key features:
- ISO-based installation using the
kubevirt-isobuilder. - Embedded configuration file to automate the installation.
- Sending boot commands to inject
ks.cfgin GRUB. - SSH provisioning with a Shell provisioner.
- Full integration with InstanceTypes and Preferences.
Follow these steps to build a Fedora VM image inside your Kubernetes cluster.
Step 1: Export KubeConfig Variable
Export your KubeConfig variable, which is also used by the Packer plugin:
export KUBECONFIG=~/.kube/config
This is required to communicate with your Kubernetes cluster.
Step 2: Deploy ISO DataVolume
Create a DataVolume to import the Fedora ISO into your cluster’s storage:
kubectl apply -f - <<EOF
apiVersion: cdi.kubevirt.io/v1beta1
kind: DataVolume
metadata:
  name: fedora-42-x86-64-iso
  annotations:
    #
    # This annotation triggers immediate binding of the PVC,
    # speeding up provisioning.
    #
    cdi.kubevirt.io/storage.bind.immediate.requested: "true"
spec:
  source:
    http:
      #
      # Please check if this URL link is valid, in case the import fails.
      # If so, please modify the URL here below.
      #
      url: "https://download.fedoraproject.org/pub/fedora/linux/releases/42/Server/x86_64/iso/Fedora-Server-dvd-x86_64-42-1.1.iso"
  pvc:
    accessModes:
      - ReadWriteOnce
    resources:
      requests:
        storage: 3Gi
EOF
Alternative: Upload a local ISO
Instead of importing from a URL, you can upload a local ISO using the virtctl client tool:
virtctl image-upload dv fedora-42-x86-64-iso \
  --size=3Gi \
  --image-path=./Fedora-Server-dvd-x86_64-42-1.1.iso \
The Fedora Server 42 ISO is available on Fedora’s official website.
Step 3: Create Kickstart File
This Kickstart file automates Fedora installation, enabling unattended VM setup.
Create a file named ks.cfg with the following configuration:
cat > ks.cfg << 'EOF'
cdrom
text
firstboot --disable
lang en_US.UTF-8
keyboard us
timezone Europe/Paris --utc
selinux --enforcing
rootpw root
firewall --enabled --ssh
network --bootproto dhcp
user --groups=wheel --name=user --password=root --uid=1000 --gecos="user" --gid=1000

bootloader --location=mbr --append="net.ifnames=0 biosdevname=0 crashkernel=no"

zerombr
clearpart --all --initlabel
autopart --type=lvm

poweroff

%packages --excludedocs
@core
qemu-guest-agent
openssh-server
%end

%post
systemctl enable --now sshd
systemctl enable --now qemu-guest-agent
%end
EOF
This configuration enables SSH to provision the temporary VM, and QEMU Guest Agent to have a better integration with KubeVirt itself.
Step 4: Create Packer Template
Create an example of the Packer template (fedora.pkr.hcl):
cat > fedora.pkr.hcl << 'EOF'
packer {
  required_plugins {
    kubevirt = {
      source  = "github.com/hashicorp/kubevirt"
      version = ">= 0.8.0"
    }
  }
}

variable "kube_config" {
  type    = string
  default = "${env("KUBECONFIG")}"
}

variable "namespace" {
  type    = string
  default = "vm-images"
}

variable "name" {
  type    = string
  default = "fedora-42-rand-85"
}

source "kubevirt-iso" "fedora" {
  # Kubernetes configuration
  kube_config   = var.kube_config
  name          = var.name
  namespace     = var.namespace

  # ISO configuration
  iso_volume_name = "fedora-42-x86-64-iso"

  # VM type and preferences
  disk_size          = "10Gi"
  instance_type      = "o1.medium"
  preference         = "fedora"
  os_type            = "linux"

  # Default network configuration
  networks {
    name = "default"

    pod {}
  }

  # Files to include in the ISO installation
  media_files = [
    "./ks.cfg"
  ]

  # Boot process configuration
  # A set of commands to send over VNC connection
  boot_command = [
    "<up>e",                            # Modify GRUB entry
    "<down><down><end>",                # Navigate to kernel line
    " inst.ks=hd:LABEL=OEMDRV:/ks.cfg", # Set kickstart file location
    "<leftCtrlOn>x<leftCtrlOff>"        # Boot with modified command line
  ]
  boot_wait                 = "10s"     # Time to wait after boot starts
  installation_wait_timeout = "15m"     # Timeout for installation to complete

  # SSH configuration
  communicator      = "ssh"
  ssh_host          = "127.0.0.1"
  ssh_local_port    = 2020
  ssh_remote_port   = 22
  ssh_username      = "user"
  ssh_password      = "root"
  ssh_wait_timeout  = "20m"
}

build {
  sources = ["source.kubevirt-iso.fedora"]

  provisioner "shell" {
    inline = [
      "echo 'Install packages, configure services, or tweak system settings here.'",
    ]
  }
}
EOF
Step 5: Export VM Image (Optional)
Optionally, export the newly created disk image and package it into a containerDisk so it can be shared across multiple Kubernetes clusters.
Required Dependencies
Install these tools on the machine running Packer:
virtctl: Exports the VM image from the KubeVirt cluster.qemu-img: Converts raw images to qcow2 format.gunzip: Decompresses exported VM images.podman: Builds and pushes container images.
Example
Add a shell-local post-processor to the Packer build, which runs after the build is completed:
variable "registry" {
  type    = string
  default = "quay.io/containerdisks"
}

variable "registry_username" {
  type      = string
  sensitive = true
}

variable "registry_password" {
  type      = string
  sensitive = true
}

variable "image_tag" {
  type    = string
  default = "latest"
}

build {
  ...

  post-processor "shell-local" {
    inline = [
      # Export VM disk image from PVC
      "virtctl -n ${var.namespace} vmexport download ${var.name}-export --pvc=${var.name} --output=${var.name}.img.gz",

      # Decompress exported VM image
      "gunzip -k ${var.name}.img.gz",

      # Convert raw image to qcow2 (smaller and more efficient format)
      "qemu-img convert -c -O qcow2 ${var.name}.img ${var.name}.qcow2",

      # Generate Containerfile
      "echo 'FROM scratch' > ${var.name}.Containerfile",
      "echo 'COPY ${var.name}.qcow2 /disk/' >> ${var.name}.Containerfile",

      # Login to registry
      "podman login -u ${var.registry_username} -p ${var.registry_password} ${var.registry}",

      # Build and push image
      "podman build -t ${var.registry}/${var.name}:${var.image_tag} -f ${var.name}.Containerfile .",
      "podman push ${var.registry}/${var.name}:${var.image_tag}"
    ]
  }
}
Sensitive credentials such as registry usernames and passwords should never be hardcoded in templates.
Step 6: Initialize Packer Plugin
Run the following command once to install the Packer plugin:
packer init fedora.pkr.hcl
This downloads and sets up the KubeVirt plugin automatically.
Step 7: Run Packer Build
Finally, run a build to create a new VM golden image with:
packer build fedora.pkr.hcl
Packer will create a new VM golden image in your Kubernetes cluster.
Conclusion
In this walkthrough, you built a Fedora VM golden image inside Kubernetes using Packer and the KubeVirt plugin. You defined an ISO source, automated installation with Kickstart configuration and provisioned the VM over SSH — all within your Kubernetes cluster.
From here, you can:
- Reuse the bootable volume to launch new VMs instantly.
- Integrate Packer builds into your CI/CD pipelines.
- Adapt the same process to build images for other operating systems, such as RHEL and Windows.
The plugin is still in pre-release, but it already offers a streamlined way to create consistent VM images inside Kubernetes.
Give it a try and share your feedback or contributions on GitHub!