Running virtual machines in Istio service mesh
Introduction
This blog post demonstrates running virtual machines in Istio service mesh.
Istio service mesh allows to monitor, visualize, and manage traffic between pods and external services by injecting a proxy container - a sidecar - which forwards inbound and outbound traffic of a pod/virtual machine. This allows the sidecar to collect metadata about the proxied traffic and also actively interfere with it. For more in-depth information about the Istio proxy mechanism, see this blog post published by Dough Smith et al.
The main features of Istio are traffic shifting (migrating traffic from an old to new version of a service), dynamic request routing, fault injection or traffic mirroring for testing/debugging purposes, and more. Visit Istio documentation to learn about all its features. Istio featureset may be further extended by installing addons. Kiali, for example, is a UI dashboard that provides traffic information of all microservices in a mesh, capable of composing communication graph between all microservices.
Prerequisites
- KubeVirt
v0.43.0 - CRI-O
v1.19.0
Limitations
Istio is only supported with masquerade network binding and pod network over IPv4.
Demo
This section covers deployment of a local cluster with Istio service mesh, KubeVirt installation and creation of an Istio-enabled virtual machine. Finally, Kiali dashboard is used to examine both inbound and outbound traffic of the created virtual machine.
Run Kubernetes cluster
In this blog post, we are going to use kubevirtci as our Kubernetes ephemeral cluster provider.
Follow these steps to deploy a local cluster with pre-installed Istio service mesh:
git clone https://github.com/kubevirt/kubevirtci
cd kubevirtci
export KUBEVIRTCI_TAG=2108222252-0007793
# Pin to version used in this blog post in case
# k8s-1.21 provider version disappears in the future
git checkout $KUBEVIRTCI_TAG
export KUBEVIRT_NUM_NODES=2
export KUBEVIRT_PROVIDER=k8s-1.21
export KUBEVIRT_DEPLOY_ISTIO=true
export KUBEVIRT_WITH_CNAO=true
make cluster-up
export KUBECONFIG=$(./cluster-up/kubeconfig.sh)
For details about Istio configuration, see Istio kubevirtci install script.
Install Kubevirt
Following KubeVirt user guide to install released version v0.43.0:
export RELEASE=v0.43.0
kubectl apply -f "https://github.com/kubevirt/kubevirt/releases/download/${RELEASE}/kubevirt-operator.yaml"
kubectl apply -f "https://github.com/kubevirt/kubevirt/releases/download/${RELEASE}/kubevirt-cr.yaml"
kubectl -n kubevirt wait kv kubevirt --timeout=180s --for condition=Available
Install Istio addons
While the ephemeral kubevirtci installs core Istio components, addons like Kiali dashboard are not installed by default. Download Istio manifests and client binary by running the following command:
export ISTIO_VERSION=1.10.0
curl -L https://istio.io/downloadIstio | sh -
and export path to the istioctl binary by following the output of the above command.
Finally, deploy Kiali, Jaeger and Prometheus addons:
kubectl create -f istio-${ISTIO_VERSION}/samples/addons/kiali.yaml
kubectl create -f istio-${ISTIO_VERSION}/samples/addons/jaeger.yaml
kubectl create -f istio-${ISTIO_VERSION}/samples/addons/prometheus.yaml
Note: If there are errors when installing the addons, try running the command again. There may be timing issues which will be resolved when the command is run again.
Prepare target namespace
Before creating virtual machines, the target namespace needs to be configured for the Istio sidecar to be injected and working properly.
This involves adding a label and creating a NetworkAttachmentDefinition in the target namespace.
Istio sidecar injection
Istio supports two ways of injecting a sidecar to a pod - automatic and manual. For simplicity, we will only consider automatic sidecar injection in this demo, which is enabled by adding istio-injection=enabled label to target namespace:
kubectl label namespace default istio-injection=enabled
Network attachment definiton
When Multus is installed in k8s cluster, a NetworkAttachmentDefinition called istio-cni must be created in each namespace where Istio sidecar containers are to be used:
cat <<EOF | kubectl create -f -
apiVersion: "k8s.cni.cncf.io/v1"
kind: NetworkAttachmentDefinition
metadata:
  name: istio-cni
EOF
The NetworkAttachmentDefinition spec is empty, as its only purpose is to trigger the istio-cni binary, which configures the in-pod traffic routing.
Topology
To demonstrate monitoring and tracing capabilities, we will create two VMIs within Istio service mesh:
istio-vmirepeatedly requests external HTTP service kubevirt.io, and serves a simple HTTP server on port 8080,cirros-vmirepeatedly request the HTTP service running on theistio-vmiVMI.
With this setup, both inbound and outbound
traffic metrics can be observed in Kiali dashboard for istio-vmi.
Create VMI resources
An Istio aware virtual machine must be annotated with sidecar.istio.io/inject: "true", regardless of used Istio injection mechanism.
Without this annotation, traffic would not be properly routed through the istio proxy sidecar.
Additonally, Istio uses app label for adding contextual information to the collected telemetry.
Both, the annotation and label can be seen in the following virtual machine example:
cat <<EOF | kubectl create -f -
apiVersion: kubevirt.io/v1
kind: VirtualMachineInstance
metadata:
  annotations:
    sidecar.istio.io/inject: "true"
  labels:
    app: istio-vmi
  name: istio-vmi
spec:
  domain:
    devices:
      interfaces:
        - name: default
          masquerade: {}
          ports:
            - port: 8080
      disks:
        - disk:
            bus: virtio
          name: containerdisk
        - disk:
            bus: virtio
          name: cloudinitdisk
    resources:
      requests:
        memory: 1024M
  networks:
    - name: default
      pod: {}
  readinessProbe:
    httpGet:
      port: 8080
    initialDelaySeconds: 120
    periodSeconds: 10
    timeoutSeconds: 5
    failureThreshold: 3
    successThreshold: 3
  terminationGracePeriodSeconds: 0
  volumes:
    - name: containerdisk
      containerDisk:
        image: kubevirt/fedora-cloud-container-disk-demo:devel
    - cloudInitNoCloud:
        userData: |
          #cloud-config
          password: fedora
          chpasswd: { expire: False }
          runcmd:
          - dnf install -y screen nc
          - while true ; do sh -c "nc -lp 8080 -c  \"echo -e 'HTTP/1.1 200 OK\n\nHello'\" " ; done &
          - while true ; do curl kubevirt.io >out 2>/dev/null ; sleep 1 ; done &
      name: cloudinitdisk
EOF
The cloud init section of the VMI runs two loops requesting kubevirt.io website every second to generate outbound traffic (from the VMI) and serving simple HTTP server on port 8080, which will be used for monitoring of inbound traffic (to the VMI).
Let’s also create a service for the VMI that will be used to access the http server in istio-vmi:
cat <<EOF | kubectl create -f-
apiVersion: v1
kind: Service
metadata:
  name: istio-vmi-svc
spec:
  selector:
    app: istio-vmi
  ports:
  - port: 8080
    protocol: TCP
EOF
Finally, create the cirros-vmi VMI, for the purpose of generating inbound traffic to istio-vmi VMI:
cat <<EOF | kubectl create -f -
apiVersion: kubevirt.io/v1
kind: VirtualMachineInstance
metadata:
  annotations:
    sidecar.istio.io/inject: "true"
  name: cirros-vmi
  labels:
    app: cirros-vmi
spec:
  domain:
    devices:
      interfaces:
        - name: default
          masquerade: {}
      disks:
        - disk:
            bus: virtio
          name: containerdisk
        - disk:
            bus: virtio
          name: cloudinitdisk
    resources:
      requests:
        memory: 128M
  networks:
    - name: default
      pod: {}
  terminationGracePeriodSeconds: 0
  volumes:
    - name: containerdisk
      containerDisk:
        image: kubevirt/cirros-container-disk-demo:devel
    - name: cloudinitdisk
      cloudInitNoCloud:
        userData: |
          #!/bin/sh
          while true ; do curl istio-vmi-svc.default.svc.cluster.local:8080 ; sleep 1 ; done
EOF
Wait for the istio-vmi to be ready:
kubectl wait --for=condition=ready --timeout=180s pod -l app=istio-vmi
After creating the VMIs, the corresponding virt-launcher pods should have 3 ready containers, as shown in the snippet below:
kubectl get pods
NAME                             READY   STATUS    RESTARTS   AGE
virt-launcher-istio-vmi-XYZ      3/3     Running   0          4m13s
virt-launcher-cirros-vmi-XYZ     3/3     Running   0          2m21s
Istioctl proxy-status should report that the sidecar proxies running inside the virt-launcher pods have synced with Istio control plane:
istioctl proxy-status
NAME                                          CDS        LDS        EDS        RDS          ISTIOD                      VERSION
virt-launcher-cirros-vmi-9f765.default        SYNCED     SYNCED     SYNCED     SYNCED       istiod-7d96484d6b-5d79g     1.10.0
virt-launcher-istio-vmi-99t8t.default         SYNCED     SYNCED     SYNCED     SYNCED       istiod-7d96484d6b-nk4cd     1.10.0
Note: Displaying only relevant VMI entities.
Monitor traffic in Kiali dashboard
With both VMIs up and running, we can open the Kiali dashboard and observe the traffic metrics. Run the following command, to access Kiali dashboard:
istioctl dashboard kiali
Topology graph
Let’s start by navigating to the topology graph by clicking the Graph menu item.
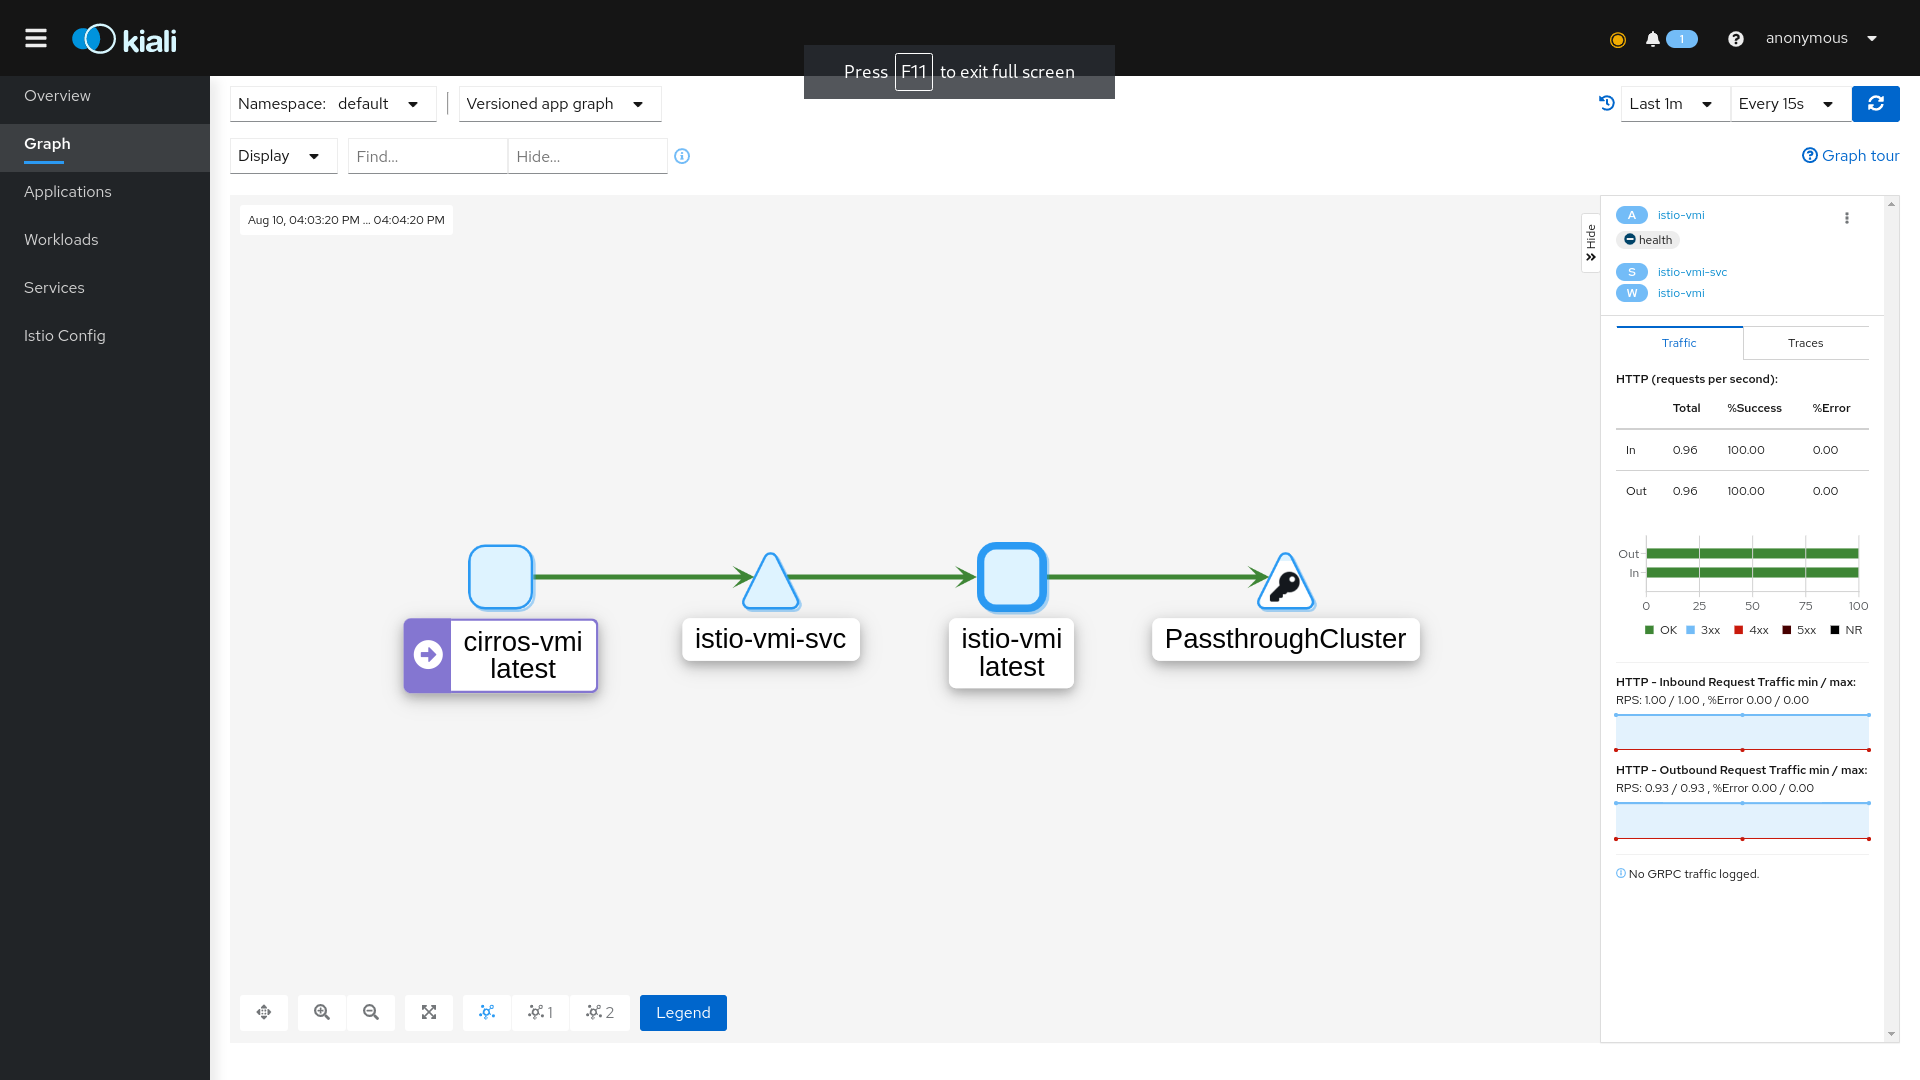
In the topology graph, we can observe the following traffic flows:
- requests from
cirros-vmitoistio-vmiviaistio-vmi-svcservice, - requests from
istio-vmitoPasstroughCluster. ThePastroughClustermarks destinations external to our service mesh.
Workloads
Navigate to istio-vmi workload overview by clicking the Workloads menu item and selecting istio-vmi from the list.
The overview page presents partial topology graph with traffic related to istio-vmi. In our case, this graph is the same as the graph of our entire mesh.
Navigate to Inbound Metrics tab to see metrics charts of inbound traffic.

In Request volume chart we can see that number of requests stabilizes at around 1 ops, which matches our loop sending one reqest per second. Request throughput chart reveals that the requests consume around 4 kbit/s of bandwidth.
Remaining two charts provide information about Request duration and size.
The same metrics are collected for outbound traffic as well, which can be seen in Outbound Metrics tab.
Cluster teardown
Run the following command to deprovision the ephemeral cluster:
make cluster-down
Conclusion
KubeVirt introduced support for Istio, allowing virtual machines to be part of a service mesh.
This blog post covered running KubeVirt virtual machine in Istio service mesh using an ephemeral kubevirtci cluster. Kiali dashboard was used to observe inbound and outbound traffic of a virtual machine.