Customizing images for containerized VMs part I
Table of contents
- The vision
- Preparation of the environment
- Building standard CentOS 8 image
- Building a standard CentOS 7 image from cloud images
Information
The content of this article has been divided into two: this one, which is the first part, explains how to create a golden image using different tools such as Builder Tool and virt-customize. Once the custom-built image is ready, it is containerized so that it can be uploaded and stored into a container registry. The second part deals with the different ways the developers can deploy, modify and connect to the VirtualMachineInstance running in the OKD Kubernetes cluster.
The vision
If you work for a software factory, some kind of development environment standardization is probably in place. There are a lot of approaches which fit different use cases. In this blog post, our example company has allowed developers to choose their preferred editing tools and debugging environment locally to their workstations. However, before committing their changes to a Git repository, they need to validate them in a specifically tailored environment. This environment, due to legal restrictions, contains exact versions of the libraries, databases, web server or any other software previously agreed with customers.
Note
Aside from the pre-commit environments, the company already has an automated continuous integration workflow composed by several shared environments: development, integration and production.
This blog post focuses on showing a use case where containerized VMs running on top of Kubernetes ease the deployment and creation of standardized VMs to our developers. These VMs are meant to be ephemeral. However, if necessary, additional non-persistent disk or shared persistent storage can be attached so that important information can be kept safe.
Along the process, different approaches and tools to create custom VM images that will be stored in a corporate registry are detailed. Containerizing VMs means adapting them so that they can be saved in a container registry. Being able to manage VMs as container images leverages the benefits of a container registry, such as:
- The registry becomes a source of truth for the VMs you want to run. Everybody can list all VMs available searching on a centralized point.
- The container registry, depending on the storage size, contains historical information of all the VMs, which might have multiple different versions, identified by their tags. Any developer with the proper permissions is able to run any specific version of your standardized VM.
- It is the unique point where all your VMs are stored avoiding having them spread all over your infrastructure.
Information
A container image registry is a service that stores container images, and is hosted either by a third-party or as a public/private registry such as Docker Hub, Quay, and so on.
The ambitious goal is allowing the developers to deploy standardized VMs on the current Kubernetes infrastructure. Then, execute the required tests and if they are good, push the code to the corporate Git repositories and delete the VM eventually.
This goal is divided into three main procedures:
- Create custom standardized VM images, also known as golden images.
- Containerize the resulting golden VM images.
- Deploy the proper VM images from the corporate registry into the OKD Kubernetes cluster.
Preparation of the environment
Running containerized VMs in KubeVirt uses the containerDisk feature which provides the ability to store and distributed VM disks in the container image registry. The disks are pulled from the container registry and reside on the local node hosting the VMs that consume the disks.
The company already have an OKD 4 Kubernetes cluster installed which provides out of the box a container registry and some required security features such as Role Based Access Controls (RBAC) and Security Context Constraints (SCC).
Information
In the OpenShift blog there is a post called Enterprise Kubernetes with OpenShift where you can find valuable information between the similarities and differences between OKD and Kubernetes.
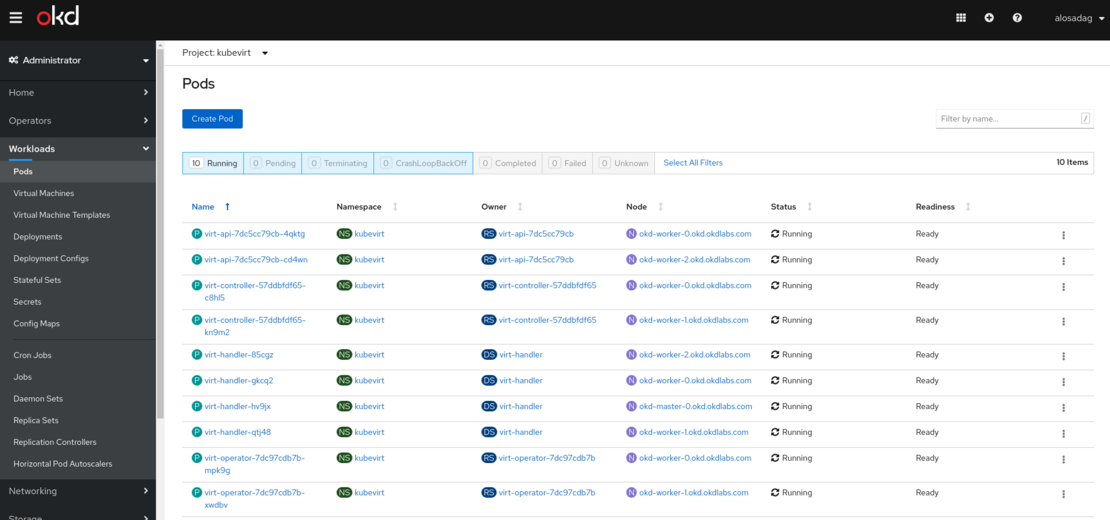
On top of the OKD cluster, KubeVirt is required so that we can run our virtual machines. The installation process is pretty well detailed in the KubeVirt’s documentation. Below it is shown how KubeVirt components can be seen from the OKD web console.
Information
KubeVirt version deployed is 0.34.2 which is the latest at the moment of writing.
$ echo $KUBEVIRT_VERSION
0.34.2

$ kubectl create -f https://github.com/kubevirt/kubevirt/releases/download/${KUBEVIRT_VERSION}/kubevirt-operator.yaml
$ kubectl create -f https://github.com/kubevirt/kubevirt/releases/download/${KUBEVIRT_VERSION}/kubevirt-cr.yaml
Warning
oc is the specific command-line tool for OKD, however, it is based in kubectl plus some additional features detailed here. It is probably that along the blog post, you can find executions with oc or kubectl interchangeably.
containerDisks are created from RAW or QCOW2 virtual machine images. Nevertheless, virtual machine images with all the agreed software and proper configuration must be created previously. The company currently uses CentOS 7 as their approved base operating system to run their applications. However, during the last months, it has been encouraging to move to the recently released version 8 of CentOS.
From a long time they had been using the prebuilt CentOS cloud images with virt-customize, which allowed them to modify the prebuilt cloud images. As a trade-off, they had to trust on the cloud image provided by CentOS or verify if new packages were added on each release.
Information
virt-customize can customize a virtual machine (disk image) by installing packages, editing configuration files, and so on. Virt-customize modifies the guest or disk image in place.
Now, they are starting to use a new tool called Image Builder that creates deployment-ready customized system images from scratch. Furthermore, there is an integration with Cockpit where you can create custom CentOS images in various formats including QCOW2 for OpenStack, AMI (Amazon Machine Image), VHD (Azure Disk Image) etc. from a friendly user interface.
Note
There are a lot of tools that can accomplish the objective of creating custom images. Here we are focusing on two: virt-customize and Image Builder.
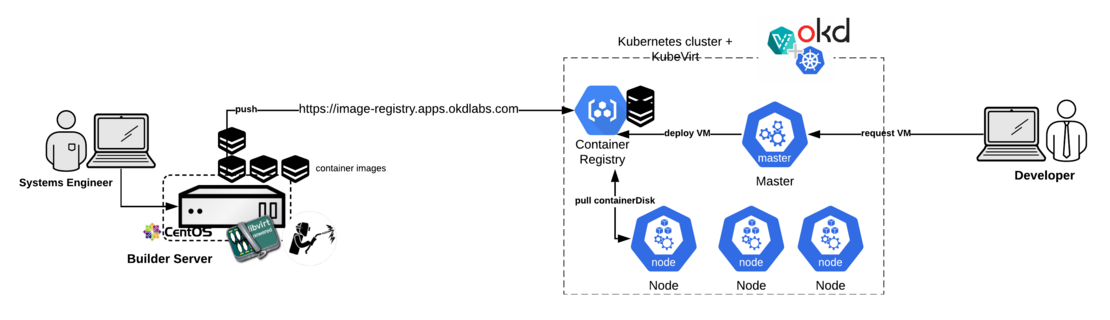
Along this blog post, both tools are used together in the image building process, leveraging their strengths. In the following diagram is depicted the different agents that take part in the process of running our standardized VMs in Kubernetes. This workflow includes the creation and customization of the images, their containerization, storing them into the OKD container registry and finally the creation of the VMs in Kubernetes by the employees.
Configuration of the Builder image server
In order to prepare the building environment, it is recommended to install Image Builder in a dedicated server as it has specific security requirements. Actually, the lorax-composer which is one of its components doesn’t work properly with SELinux running, as it installs an entire OS image in an alternate directory.
Warning
As shown in the lorax-composer documentation SELinux must be disabled. However, I have been able to create custom images successfully with SELinux enabled. In case you find any problems during your building, check the lorax-composer logs in journal in order to get more detailed information.
Here it is a table where the software required to run the builds along with the versions have been used.
Note
Operating System is CentOS 8 since CentOS 7 Image Builder is still an experimental feature
| Component | Version | | ——— | ———————————————————————————————– | | Operating System | CentOS Linux release 8.2.2004 (Core) | | Libvirt | libvirtd (libvirt) 4.5.0 | | virt-customize | virt-customize 1.38.4rhel=8,release=14.module_el8.1.0+248+298dec18,libvirt | | Image Builder | lorax-composer (28.14.42-2), composer-cli (composer-cli-28.14.42-2), cockpit-composer (cockpit-composer-12.1-1.el8.noarch) |
Once the builder image server is provisioned with latest CentOS 8, the Virtualization Host group package is installed. It will be required to test our customized images locally before containerizing and pushing them to the OKD registry.
yum groupinstall "Virtualization Host" -y
systemctl enable libvirtd --now
Next, virt-customize is installed from the libguestfs-tools package along with the Image Builder. The latest is composed by lorax-composer, the Cockpit composer plugin and the composer-cli, which will be used to interact directly with Composer using command-line.
dnf install -y libguestfs-tools lorax-composer composer-cli cockpit-composer
systemctl enable lorax-composer.socket
systemctl enable lorax-composer --now
systemctl start cockpit
Then, the local firewall is configured so that we can connect to the Cockpit web user interface from our workstation.
firewall-cmd --add-service=cockpit && firewall-cmd --add-service=cockpit --permanent
Finally, connect to the Cockpit user interface by typing the IP or name of the Builder image server and port TCP/9090 (Cockpit’s default) in your favourite web browser. Then, log in with a local administrator account.
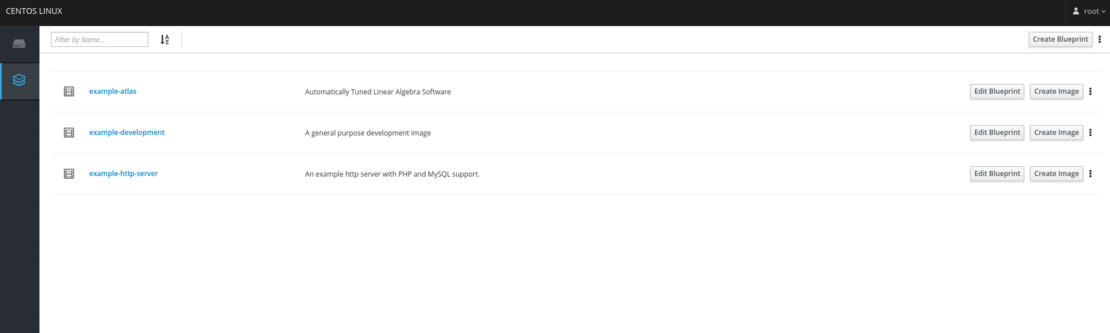
The following image shows the Image Build plugin web page. Actually, what it is depicted are the different Image Build blueprints that are shipped by default. The blueprint defines what should be included in your image. This includes packages, users, files, server settings …
Error
If Cockpit’s web UI is not working, take a look at the output of the lorax service with the command:
journalctl -fu lorax-composer
Building standard CentOS 8 image
It is time to create our standardized CentOS 8 image or also called golden CentOS 8 image. This image will be built from the ground up using the Image Builder tool.
Image creation with Builder Tool
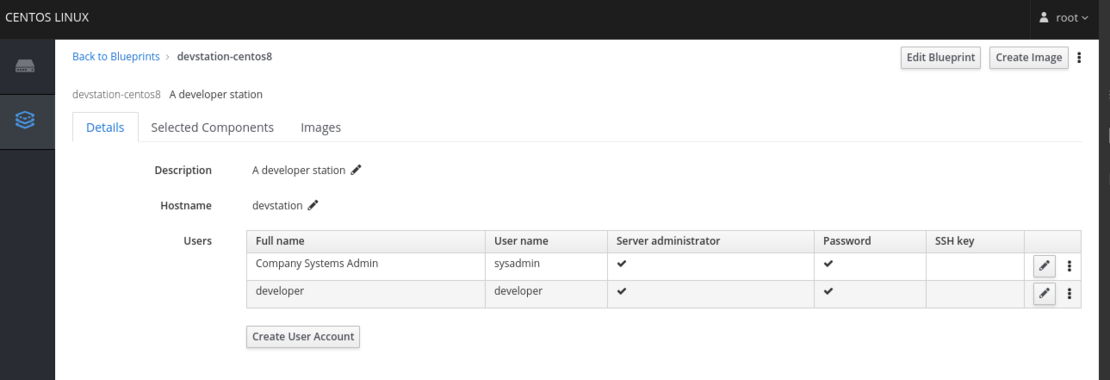
The easiest way to start is creating a new blueprint (devstation-centos8) from the Cockpit user interface. This will produce a scaffold file where all the required modifications can be made. Here it is shown the process of creation a new blueprint from Cockpit:

I would also suggest adding some users and all the packages you want to install from the user interface. In our case, we are going to create the following users by clicking on the details tab of the new blueprint. In both cases, the password is known by the respective group of users and also belongs to the wheel group.
| Users | Note |
|---|---|
| sysadmin | Privileged user owned by the Systems Engineering team to troubleshoot and have access to the VM |
| developer | These are the credentials used by the developers to access the VM |
Next, select the packages to include. Add the proper version of the package already agreed with the customer.
| Package | Version |
|---|---|
| httpd | 2.4.37 |
| mod_ssl | 2.4.37 |
| php | 7.2.24 |
| mariadb-server | 10.3.17 |
| openssh-server | latest |
At this point, you already have a blueprint template to start working. In addition to using the web console, you can also use the Image Builder CLI to create images. When using the CLI, you have access to a few more customization options, such as managing firewall rules or download files from Git. Since we already have installed the composer-cli package in the Image Builder server, let’s use it to further customize our golden image.
First, access to the Builder Image server and download the custom blueprint called devstation-centos8.
$ composer-cli blueprints list
devstation-centos8
example-atlas
example-development
Example-http-server

$ composer-cli blueprints save devstation-centos8
$ ls
devstation-centos8.toml
Information
All composer-cli options are documented in the official webpage. Take a look if you need further detail.
Now, let’s edit the devstation-centos8.toml file which is in charge of building our custom image.
- The time zone has been added to match Europe/Madrid with proper NTP servers.
- The kernel has been modified to allow connection via console.
- Several firewall rules have been added to allow our services being accessed from outside.
- Some services have been configured so that they are enabled and started at boot.
- A Git repository has been configured to be cloned. Actually, it is a Git repository that contains a manual detailing how the custom image is configured and how it must be used.
Warning
It is important to add console as a kernel option since the Builder Image tool disables access to serial console by default. It will allow the virtctl command to connect to the VM while it is booting in our OKD Kubernetes cluster.
This is the final building configuration file, it can be downloaded from here
name = "devstation-centos8"
description = "A developer station"
version = "0.0.1"
modules = []
groups = []

[[packages]]
name = "httpd"
version = "2.4.37"

[[packages]]
name = "mod_ssl"
version = "2.4.37"

[[packages]]
name = "php"
version = "7.2.24"

[[packages]]
name = "mariadb-server"
version = "10.3.17"

[[packages]]
name = "openssh-server"
version = "*"

[customizations]
hostname = "devstation"

[customizations.kernel]
append = "console=tty0 console=ttyS0,19200n81"

[customizations.timezone]
timezone = "Europe/Madrid"
ntpservers = ["0.europe.pool.ntp.org", "1.europe.pool.ntp.org"]

[[customizations.user]]
name = "sysadmin"
description = "Company Systems Admin"
password = "$6$ZGmDxvGu3Q0M4RO/$KkfU0bD32FrLNpUCWEL8sy3dknJVyqExoy.NJMOcSCRjpt1H6sFKFjx8mFWn8H5CWTP7.bibPLBrRSRq3MrDb."
home = "/home/sysadmin/"
shell = "/usr/bin/bash"
groups = ["users", "wheel"]

[[customizations.user]]
name = "developer"
description = "developer"
groups = ["wheel"]
password = "$6$wlIgNacMnqCcXn3o$mPpw0apT4iZ3jDq0q6epXN3xCmNN.oVGFW.Gvu9r0nDVX.FXY3iCwfFkfPEcmhj7Kxw4Ppoes2LsUzPtNRjez0"

[customizations.services]
enabled = ["httpd","mariadb","sshd"]

[customizations.firewall.services]
enabled = ["http","https","mysql","ssh"]

[[repos.git]]
rpmname = "manual"
rpmversion = "1.0"
rpmrelease = "1"
summary = "Manual how to work with devstation"
repo = "https://github.com/alosadagrande/lorax"
ref = "master"
destination = "/var/www/html/manual"
Note
In this case, we are using a Git repository to download useful information on how to deal with the customized image. However, it is possible to download for instance code or other information that can be stored in Git. And what is most important, it is versioned.
Once edited, push the configuration to Image Builder and start the building process by selecting the blueprint and the output format. Builder Image tool can export the same blueprint into multiple output formats. Thus, one blueprint might create the same custom image running on multiple providers (qcow2 in our case).
$ composer-cli blueprints push devstation-centos8.toml

$ composer-cli compose start devstation-centos8 qcow2
Compose 248161f5-0870-41e8-b871-001348395ca7 added to the queue
Note
It is possible to verify that the modified blueprint has been pushed successfully by executing the show command.
$ composer-cli blueprints show devstation-centos8
The building process can take tens of minutes. It is possible to see the process by checking the lorax-composer logs in the journal or request the status of the blueprint built from the composer-cli:
$ composer-cli compose status
248161f5-0870-41e8-b871-001348395ca7 RUNNING  Fri Nov 27 15:12:09 2020 devstation-centos8 0.0.2 qcow2

$ journalctl -u lorax-composer -f
Nov 27 15:13:31 eko3.cloud.lab.eng.bos.redhat.com lorax-composer[38218]: 2020-11-27 15:13:31,715: Installing.
Nov 27 15:13:31 eko3.cloud.lab.eng.bos.redhat.com lorax-composer[38218]: 2020-11-27 15:13:31,716: Starting package installation process
Nov 27 15:13:31 eko3.cloud.lab.eng.bos.redhat.com lorax-composer[38218]: 2020-11-27 15:13:31,716: Downloading packages
Nov 27 15:13:31 eko3.cloud.lab.eng.bos.redhat.com lorax-composer[38218]: 2020-11-27 15:13:31,716: Downloading 474 RPMs, 3.75 MiB / 396.83 MiB (0%) done.
Nov 27 15:13:31 eko3.cloud.lab.eng.bos.redhat.com lorax-composer[38218]: 2020-11-27 15:13:31,716: Downloading 474 RPMs, 15.58 MiB / 396.83 MiB (3%) done.
Once the building process is finished, it is time to download the QCOW2 file. It can be downloaded from Cockpit UI or from the composer-cli:
$ composer-cli compose image 248161f5-0870-41e8-b871-001348395ca7
248161f5-0870-41e8-b871-001348395ca7-disk.qcow2: 1854.31 MB

$ ls -lhrt
-rw-r--r--.  1 root root 1.5K Nov 27 15:11 devstation-centos8.toml
-rw-r--r--.  1 root root 1.9G Nov 27 15:26 248161f5-0870-41e8-b871-001348395ca7-disk.qcow2
Afterwards, the image is suggested to be renamed to something more meaningful. Below the information given by qemu is exhibited:
$ mv 248161f5-0870-41e8-b871-001348395ca7-disk.qcow2  golden-devstation-centos8-disk.qcow2

$ qemu-img info golden-devstation-centos8-disk.qcow2
image: golden-devstation-centos8-disk.qcow2
file format: qcow2
virtual size: 4.3G (4566548480 bytes)
disk size: 1.8G
cluster_size: 65536
Format specific information:
    compat: 1.1
    lazy refcounts: false
    refcount bits: 16
    corrupt: false
Warning
Virtual size of the image is 4.3G, since we agreed 10G the disk must be resized and root filesystem expanded before being containerized. Currently, there is no way to specify disk capacity in containerDisk as it can be done with emptyDisks. The size of the root filesystem and disk when running in KubeVirt is driven by the image. It is recommended to save the QCOW2 images under /var/lib/libvirt/images/ so that qemu user have permissions to expand or resize them.
$ qemu-img resize golden-devstation-centos8-disk.qcow2 10G
Image resized.
The expansion is executed on the root partition, which in case of our golden image is /dev/sda2 partition. It must be checked previously, for instance using the virt-filesystems utility:
$ virt-filesystems --partitions --long -a golden-devstation-centos8-disk.qcow2
Name       Type       MBR  Size        Parent
/dev/sda1  partition  83   1073741824  /dev/sda
/dev/sda2  partition  83   2966421504  /dev/sda
Note that a copy of the golden image is created and that’s the one expanded.
$ cp golden-devstation-centos8-disk.qcow2 golden-devstation-centos8-disk-10G.qcow2
$ virt-resize --expand /dev/sda2  golden-devstation-centos8-disk.qcow2 golden-devstation-centos8-disk-10G.qcow2
[   0.0] Examining golden-devstation-centos8-disk-10G.qcow2
**********

Summary of changes:

/dev/sda1: This partition will be left alone.

/dev/sda2: This partition will be resized from 2.7G to 9.0G.  The
filesystem xfs on /dev/sda2 will be expanded using the ‘xfs_growfs’
method.

**********
[   2.2] Setting up initial partition table on golden-devstation-centos8-disk-10G.qcow2
[   3.1] Copying /dev/sda1
[   4.0] Copying /dev/sda2
 100%
[   8.5] Expanding /dev/sda2 using the ‘xfs_growfs’ method

Resize operation completed with no errors.  Before deleting the old disk,
carefully check that the resized disk boots and works correctly.
Finally, it is verified that the image meets the expected size (see virtual size):
$ qemu-img info golden-devstation-centos8-disk-10G.qcow2
image: golden-devstation-centos8-disk-10G.qcow2
file format: qcow2
virtual size: 10G (10737418240 bytes)
disk size: 1.8G
cluster_size: 65536
Format specific information:
    compat: 1.1
    lazy refcounts: false
    refcount bits: 16
    corrupt: false
Note
In case the developers are allowed to select between multiple flavours, e.g. different root filesystem sizes, you will end up with multiple containerized VM images. In the event that an additional block device is needed, emptyDisk is the proper way to go.
Verify the custom-built image
Before continuing, it is suggested to verify the golden expanded image. Since the qcow2 image is not yet containerized, it can easily run on KVM/libvirt. In our case, the builder server has already in place the Virtualization Host group packages.
Information
There are a lot of tools that allow us to run a qcow2 image in libvirt. In this example, virt-install is used, however, other tool that makes easy to deploy VM images and worth exploring is kcli
First, install virt-install, which is a command-line tool for creating new KVM, Xen, or Linux container guests using the “libvirt” hypervisor management library, and run a new VM from the golden image:
$ yum install virt-install -y
$ virt-install --version
2.2.1

$ virt-install --memory 2048 --vcpus 2 --name devstation-centos8 --disk /var/lib/libvirt/images/golden-devstation-centos8-disk-10G.qcow2,device=disk --os-type Linux --os-variant rhel8.1 --virt-type kvm --graphics none --network default --import

Starting install...
Connected to domain devstation-centos8
Escape character is ^]

CentOS Linux 8 (Core)
Kernel 4.18.0-147.5.1.el8_1.x86_64 on an x86_64
devstation login:
Login as developer or sysadmin user, scale privileges and check that the VM is configured as expected.
$ firewall-cmd --list-all
public (active)
  target: default
  icmp-block-inversion: no
  interfaces: ens3
  sources:
  services: cockpit dhcpv6-client http https mysql ssh
$ systemctl is-active httpd
active
$ systemctl is-active mariadb
active
$ systemctl is-active sshd
active
Verify the disk and partition sizes are correctly configured:
$ lsblk
NAME   MAJ:MIN RM SIZE RO TYPE MOUNTPOINT
vda    252:0    0  10G  0 disk
├─vda1 252:1    0   1G  0 part /boot
└─vda2 252:2    0   9G  0 part /

$ df -h
Filesystem      Size  Used Avail Use% Mounted on
devtmpfs        962M     0  962M   0% /dev
tmpfs           995M     0  995M   0% /dev/shm
tmpfs           995M   17M  979M   2% /run
tmpfs           995M     0  995M   0% /sys/fs/cgroup
/dev/vda2       9.0G  1.9G  7.2G  21% /
Note
In case you are unsure on which partition you need to expand or contains the root filesystem, just run a VM from the golden qcow2 image and execute the previous commands. Then delete the VM and expand the image accordingly.
Finally, notice how the cloned repository has been copied successfully during the built process. Users can check the custom image information connecting to the local Apache server:
[root@devstation ~]# curl localhost/manual/
Dear developer,
<br>
<br>
Welcome to the devstation server.

<h2> How to use the devstation server </h2>

Remember that before committing your changes to the corporate source management control server, you need to validate your code here.

<h2> Need help? </h2>

Please contact us at sysadmin@corporate.com
Image tailoring with virt-customize
In the previous section, we verified that the golden image was successfully built. However, there are still a few things that need to be added so that the golden image can be successfully containerized and run on top of our OKD Kubernetes cluster.
First, a worthy package that is suggested to be included in the golden image is cloud-init. KubeVirt allows you to create VM objects along with cloud-init configurations. Cloud-init will let our developers further adapt the custom image to their application needs. On the other hand, it has been agreed with the Software Engineering team to add a graphical interface to the custom image since there are developers that are not familiar with the terminal.
The result will be two golden images CentOS 8, both with cloud-init, but one will include a GUI and the other is terminal-based and therefore much lighter.
Warning
It is important to set the memsize of the building process to 4096m and have expanded the root filesystem otherwise you will face an out of space or/and out of memory error while installing the GNOME GUI.
cp golden-devstation-centos8-disk-10G.qcow2 golden-devstation-centos8-disk-10G-gui.qcow2
virt-customize --format qcow2 -a /var/lib/libvirt/images/golden-devstation-centos8-disk-10G.qcow2 --install cloud-init --memsize 4096 --selinux-relabel
virt-customize --format qcow2 -a /var/lib/libvirt/images/golden-devstation-centos8-disk-10G-gui.qcow2 --install @graphical-server-environment,cloud-init --memsize 4096 --run-command "systemctl set-default graphical.target" --selinux-relabel
At this point we built:
- A golden CentOS 8 image which can run on libvirt/KVM virtualization servers (golden-devstation-centos8-disk.qcow2)
- A 10G CentOS 8 image prepared to be executed by KubeVirt including cloud-init. (golden-devstation-centos8-disk-10G.qcow2)
- A 10G CentOS 8 image prepared to be executed by KubeVirt including both cloud-init and GNOME GUI (golden-devstation-centos8-disk-10G-gui.qcow2)
Building a standard CentOS 7 image from cloud images
In the previous section, it was shown how we can build and customize images from scratch using the Builder Image tool. However, there are settings that could not be configured even with the composer-cli. Thus, virt-customize is used to fine-tune the custom image, i.e, add cloud-init and a graphical user interface.
Since the Builder Tool is an experimental tool in CentOS 7, the company continues creating their golden CentOS 7 images based on CentOS cloud images. Comparing with the CentOS 8 workflow, the cloud image corresponds to the golden image even it is not built by the Systems Engineering department.
Warning
Note that with CentOS 7 images, the company is trusting a cloud image provided by a third party instead of creating one from scratch.
Image creation with virt-customize
The process to create the golden CentOS 7 image is quite similar to the CentOS 8 one. However, in this case, the customize procedure is entirely done with virt-customize. The first step is to download the cloud image.
curl -o /var/lib/libvirt/images/golden-devstation-centos7-disk.qcow2 https://cloud.centos.org/centos/7/images/CentOS-7-x86_64-GenericCloud.qcow2
Then, it is required to resize and expand the image to meet the agreed size of 10GB. The details are the same explained in the previous section
$ qemu-img info golden-devstation-centos7-disk.qcow2
image: golden-devstation-centos7-disk.qcow2
file format: qcow2
virtual size: 8.0G (8589934592 bytes)
disk size: 819M
cluster_size: 65536
Format specific information:
    compat: 1.1
    lazy refcounts: false
    refcount bits: 16
    corrupt: false

$ qemu-img resize golden-devstation-centos7-disk.qcow2 10G
Image resized.

$ cp golden-devstation-centos7-disk.qcow2 golden-devstation-centos7-disk-10G.qcow2
$ virt-resize --expand /dev/sda1  golden-devstation-centos7-disk.qcow2 golden-devstation-centos7-disk-10G.qcow2
Warning
In this case, unlike CentOS 8 image, the partition where the root filesystem resides is /dev/sda1. That’s the partition that needs to be expanded.
Below it is the virt-customize command that modifies the CentOS 7 expanded cloud image by:
- Installing the required packages (however, not the exact versions)
- Changing the root password
- Setting devstation as hostname to the customized image
- Configuring the time zone
- Enabling the installed services
- Including files from the manual.
Note
Manual files must be pulled first from alosadagrande/lorax GitHub repository.
$ virt-customize --format qcow2 -a /var/lib/libvirt/images/golden-devstation-centos7-disk-10G.qcow2 \
                                --install cloud-init,mod_ssl,httpd,mariadb-server,php,openssh-server \
                                --memsize 4096  --hostname devstation  --selinux-relabel --timezone Europe/Madrid \
                                --root-password password:toor --password centos:password:developer123 \
                                --run-command 'systemctl enable httpd' --run-command 'systemctl enable mariadb' \
                                --mkdir /var/www/html/manual --upload ~/lorax/index.html:/var/www/html/manual/index.html
Information
Instead of executing all parameters in the command-line it is possible to create a file that is used as an input file for virt-customize. See option commands-from-file
Next, we need to create the graphical user interface image in a similar way as we did previously with CentOS 8 image.
cp golden-devstation-centos7-disk-10G.qcow2 golden-devstation-centos7-disk-10G-gui.qcow2

virt-customize --format qcow2 -a /var/lib/libvirt/images/golden-devstation-centos7-disk-10G-gui.qcow2 --install cloud-init --memsize 4096 --run-command "yum groupinstall 'GNOME Desktop' -y" --run-command "systemctl set-default graphical.target" --selinux-relabel
At this point we built:
- A golden CentOS 7 image which can run on libvirt/KVM virtualization servers (golden-devstation-centos7-disk.qcow2).
- A 10G CentOS 7 image prepared to be executed by KubeVirt which includes cloud-init (golden-devstation-centos7-disk-10G.qcow2).
- A 10G CentOS 7 image prepared to be executed by KubeVirt which includes cloud-init and GNOME GUI (golden-devstation-centos7-disk-10G-gui.qcow2).
Image containerization procedure
The procedure to inject a VirtualMachineInstance disk into a container images is pretty well explained in containerDisk Workflow example from the official documentation. Only RAW and QCOW2 formats are supported and the disk it is recommended to be placed into the /disk directory inside the container. Actually, it can be placed in other directories, but then, it must be explicitly configured when creating the VirtualMachine
Currently, there are 4 standardized images ready to be containerized. The process is the same for all of them, so in order to keep it short, we are just going to show the process of creating a container image from the CentOS 8 QCOW2 images.
Information
These are the four available images: CentOS 8 with GNOME, CentOS 8 terminal only, CentOS 7 with GNOME and CentOS 7 terminal only.
$ cat << EOF > Containerfile
FROM scratch
ADD golden-devstation-centos8-disk-10G.qcow2 /disk/
EOF
$ cat Containerfile
FROM scratch
ADD golden-devstation-centos8-disk-10G-gui.qcow2 /disk/
Then, it is time to build the image. In our case, podman has chosen to execute the task, however, we could have used docker or buildah.
$ podman build . -t openshift/devstation-centos8:terminal
STEP 1: FROM scratch
STEP 2: ADD golden-devstation-centos8-disk-10G.qcow2 /disk/
STEP 3: COMMIT openshift/devstation-centos8:terminal
8a9e83db71f08995fa73699c4e5a2d331c61b393daa18aa0b63269dc10078467

$ podman build . -t openshift/devstation-centos8:gui
STEP 1: FROM scratch
STEP 2: ADD golden-devstation-centos8-disk-10G-gui.qcow2 /disk/
STEP 3: COMMIT openshift/devstation-centos8:gui
2a4ecc7bf9da91bcb5847fd1cf46f4cd10726a4ceae88815eb2a9ab38b316be4
After the successful build, the images are stored locally to the local server, in our case the Builder Server. Remember that they must be uploaded to the OKD container registry.
$ podman images
REPOSITORY                               TAG        IMAGE ID       CREATED          SIZE
localhost/openshift/devstation-centos8   gui        2a4ecc7bf9da   3 minutes ago    5.72 GB
localhost/openshift/devstation-centos8   terminal   8a9e83db71f0   13 minutes ago   1.94 GB
Store the image in the container registry
Before pushing the images to the corporate container registry, it must be verified that the OKD registry is available outside the Kubernetes cluster. This allows any authenticated user to gain external access to push images into the OKD Kubernetes cluster. Exposing the secure registry consists basically on configuring a route and expose that route in the OKD routers. Once done, external authenticated access is allowed.
$ oc get route -n openshift-image-registry
NAME            HOST/PORT                                                     PATH   SERVICES         PORT    TERMINATION   WILDCARD
default-route   default-route-openshift-image-registry.apps.okd.okdlabs.com          image-registry   <all>   reencrypt     None
Note
In order to upload your containerized images to the OKD registry, the user must be authenticated and authorized to execute the push action. The role that must be added to the OKD user is the registry-editor
In order to authenticate with the OKD container registry, podman is employed as explained in the official documentation.
$ oc login https://api.okd.okdlabs.com:6443 -u alosadag
The server uses a certificate signed by an unknown authority.
You can bypass the certificate check, but any data you send to the server could be intercepted by others.
Use insecure connections? (y/n): y

Authentication required for https://api.okd.okdlabs.com:6443 (openshift)
Username: alosadag
Password:
Login successful.

$ HOST=$(oc get route default-route -n openshift-image-registry -o jsonpath='{.spec.host }')
$ echo $HOST
default-route-openshift-image-registry.apps.okd.okdlabs.com

$  podman login -u $(oc whoami) -p $(oc whoami -t) --tls-verify=false $HOST
Login Succeeded!
Before pushing the images, adapt container images to the proper name so they can be uploaded to private registries. Since it is agreed that all developers must be able to pull the images into their namespaces, the images need to be pushed to the openshift project.
Information
Understanding containers, images and imageStreams from OpenShift documentation deeply explains container image naming.
podman tag localhost/openshift/devstation-centos8:gui default-route-openshift-image-registry.apps.okd.okdlabs.com/openshift/devstation:v8-terminal
podman push default-route-openshift-image-registry.apps.okd.okdlabs.com/openshift/devstation:v8-terminal --tls-verify=false
podman tag localhost/openshift/devstation-centos:gui default-route-openshift-image-registry.apps.okd.okdlabs.com/openshift/devstation:v8-gui
podman push default-route-openshift-image-registry.apps.okd.okdlabs.com/openshift/devstation:v8-gui --tls-verify=false
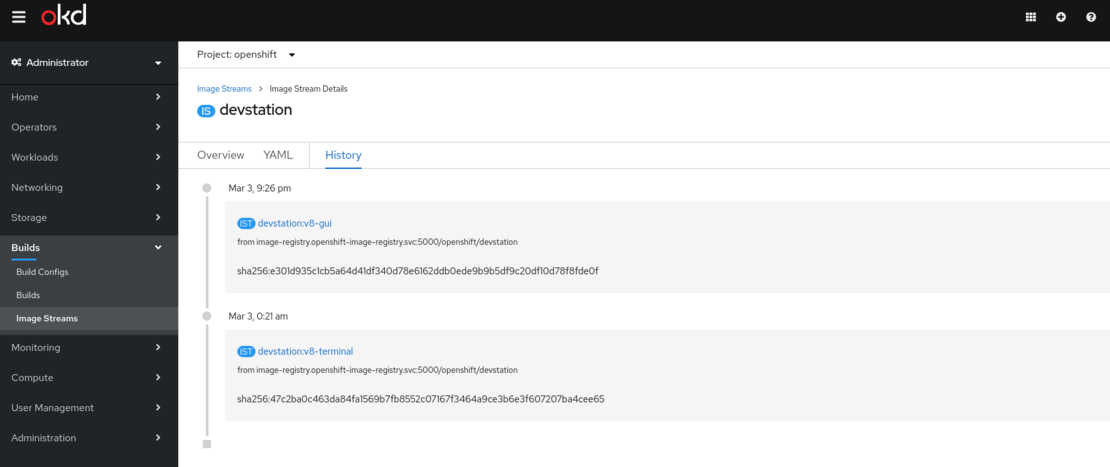
Verify that the images are stored correctly in the OKD container registry by checking the imageStream. As shown below, both images were uploaded successfully since the devstation imageStream contains two images with v8-gui and v8-terminal tags respectively.
oc describe imageStream devstation -n openshift
Name:                   devstation
Namespace:              openshift
Created:                23 hours ago
Labels:                 <none>
Annotations:            <none>
Image Repository:       default-route-openshift-image-registry.apps.okd.okdlabs.com/openshift/devstation
Image Lookup:           local=false
Unique Images:          2
Tags:                   2

v8-gui
  no spec tag

  * image-registry.openshift-image-registry.svc:5000/openshift/devstation@sha256:e301d935c1cb5a64d41df340d78e6162ddb0ede9b9b5df9c20df10d78f8fde0f
      2 hours ago

v8-terminal
  no spec tag

  * image-registry.openshift-image-registry.svc:5000/openshift/devstation@sha256:47c2ba0c463da84fa1569b7fb8552c07167f3464a9ce3b6e3f607207ba4cee65
At this point, the images are stored in a private registry and ready to be consumed by the developers.
Information
In case you do not have a corporate private registry available, you can upload images to any free public container registry. Then, consume the container images from the public container registry. Just in case you want to use them or take a look, it has been uploaded to my public container image repository at quay.io
In the next article, we will show how our developers can consume the custom-built images to run into the OKD Kubernetes cluster.
Summary
In this blog post, it was detailed a real use of a company that uses KubeVirt to run standardized environments to run and test the code of their applications. In their use case, VMs are spinned up on-demand in the OKD Kubernetes cluster by the developers. This makes them completely autonomous creating and deleting their environments once the tasks are accomplished.
The article explained how to create a golden image using different tools such as Builder Tool and virt-customize. Once the custom-built image was ready, then it is transformed into a container image so that it can be uploaded and stored into a container registry.
Information
In the next blog post, the custom-built containerized VM will be deployed from our corporate registry into our Kubernetes cluster. We will show how the developers can fine-tune even more the image deployment, how extra storage can be requested and how to connect to the VirtualMachineInstance. Stay tuned!