Kubevirt Network Deep Dive
In this post we will research and discover how KubeVirt networking functions along with Kubernetes objects services and ingress. This should also provide enough technical details to start troubleshooting your own environment if a problem should arise. So with that let’s get started.
Remember to also check KubeVirt Network Rehash which provides updates to this article.
Component Installation
We are going to walk through the installation that assisted me to write this post. I have created three CentOS 7.4 with nested virtualization enabled where Kubernetes will be installed, which is up next.
Kubernetes
I am rehashing what is available in Kubernetes documentation just to make it easier to follow along and provide an identical environment that I used to research KubeVirt networking.
Packages
Add the Kubernetes repository
cat <<EOF > /etc/yum.repos.d/kubernetes.repo
[kubernetes]
name=Kubernetes
baseurl=https://packages.cloud.google.com/yum/repos/kubernetes-el7-\$basearch
enabled=1
gpgcheck=1
repo_gpgcheck=1
gpgkey=https://packages.cloud.google.com/yum/doc/yum-key.gpg https://packages.cloud.google.com/yum/doc/rpm-package-key.gpg
EOF
Update and install prerequisites.
yum update -y
yum install kubelet-1.9.4 \
            kubeadm-1.9.4 \
            kubectl-1.9.4 \
            docker \
            ansible \
            git \
            curl \
            wget -y
Docker prerequisites
For docker storage we will use a new disk vdb formatted XFS using the Overlay driver.
cat <<EOF > /etc/sysconfig/docker-storage-setup
STORAGE_DRIVER=overlay2
DEVS=/dev/vdb
CONTAINER_ROOT_LV_NAME=dockerlv
CONTAINER_ROOT_LV_SIZE=100%FREE
CONTAINER_ROOT_LV_MOUNT_PATH=/var/lib/docker
VG=dockervg
EOF
Start and enable Docker
systemctl start docker
systemctl enable docker
Additional prerequisites
In this section we continue with the required prerequistes. This is also described in the install kubeadm kubernetes documentation.
systemctl enable kubelet
This is a requirement for Flannel - pass bridged IPv4 traffic to iptables’ chains
    cat <<EOF >  /etc/sysctl.d/k8s.conf
    net.bridge.bridge-nf-call-ip6tables = 1
    net.bridge.bridge-nf-call-iptables = 1
    EOF

    sysctl --system
Temporarily disable selinux so we can run kubeadm init
setenforce 0
And let’s also permanently disable selinux - yes I know. If this isn’t done once you reboot your node kubernetes won’t start and then you will be wondering what happened :)
    cat <<EOF > /etc/selinux/config
    # This file controls the state of SELinux on the system.
    # SELINUX= can take one of these three values:
    #     enforcing - SELinux security policy is enforced.
    #     permissive - SELinux prints warnings instead of enforcing.
    #     disabled - No SELinux policy is loaded.
    SELINUX=disabled
    # SELINUXTYPE= can take one of three two values:
    #     targeted - Targeted processes are protected,
    #     minimum - Modification of targeted policy. Only selected processes are protected.
    #     mls - Multi Level Security protection.
    SELINUXTYPE=targeted
    EOF
Initialize cluster
Now we are ready to create our cluster starting with the first and only master.
Note
--pod-network-cidr is required for Flannel
kubeadm init --pod-network-cidr=10.244.0.0/16

...output...

mkdir -p $HOME/.kube
  sudo cp -i /etc/kubernetes/admin.conf $HOME/.kube/config
  sudo chown $(id -u):$(id -g) $HOME/.kube/config
There are multiple CNI providers in this example environment just going to use Flannel since its simple to deploy and configure.
kubectl apply -f https://raw.githubusercontent.com/coreos/flannel/v0.9.1/Documentation/kube-flannel.yml
After Flannel is deployed join the nodes to the cluster.
kubeadm join --token 045c1c.04765c236e1bd8da 172.31.50.221:6443 \
             --discovery-token-ca-cert-hash sha256:redacted
Once all the nodes have been joined check the status.
$ kubectl get node
NAME                  STATUS    ROLES     AGE       VERSION
km1.virtomation.com   Ready     master    11m       v1.9.4
kn1.virtomation.com   Ready     <none>    10m       v1.9.4
kn2.virtomation.com   Ready     <none>    10m       v1.9.4
Additional Components
KubeVirt
The recommended installation method is to use kubevirt-ansible. For this example I don’t require storage so just deploying using kubectl create.
For additional information regarding KubeVirt install see the installation readme.
$ kubectl create -f https://github.com/kubevirt/kubevirt/releases/download/v0.4.1/kubevirt.yaml
serviceaccount "kubevirt-apiserver" created

... output ...

customresourcedefinition "offlinevirtualmachines.kubevirt.io" created
Let’s make sure that all the pods are running.
$ kubectl get pod -n kube-system -l 'kubevirt.io'
NAME                               READY     STATUS    RESTARTS   AGE
virt-api-747745669-62cww           1/1       Running   0          4m
virt-api-747745669-qtn7f           1/1       Running   0          4m
virt-controller-648945bbcb-dfpwm   0/1       Running   0          4m
virt-controller-648945bbcb-tppgx   1/1       Running   0          4m
virt-handler-xlfc2                 1/1       Running   0          4m
virt-handler-z5lsh                 1/1       Running   0          4m
Skydive
I have used Skydive in the past. It is a great tool to understand the topology of software-defined-networking. The only caveat is that Skydive doesn’t create a complete topology when using Flannel but there is still a good picture of what is going on. So with that let’s go ahead and install.
kubectl create ns skydive
kubectl create -n skydive -f https://raw.githubusercontent.com/skydive-project/skydive/master/contrib/kubernetes/skydive.yaml
Check the status of Skydive agent and analyzer
$ kubectl get pod -n skydive
NAME                                READY     STATUS    RESTARTS   AGE
skydive-agent-5hh8k                 1/1       Running   0          5m
skydive-agent-c29l7                 1/1       Running   0          5m
skydive-analyzer-5db567b4bc-m77kq   2/2       Running   0          5m
ingress-nginx
To provide external access our example NodeJS application we need to an ingress controller. For this example we are going to use ingress-nginx
I created a simple script ingress.sh that follows the installation documentation for ingress-nginx with a couple minor modifications:
-
Patch the
nginx-configurationConfigMap to enable vts status -
Add an additional
containerPortto the deployment and an additional port to the service. -
Create an ingress to access nginx status page
The script and additional files are available in the github repo listed below.
git clone https://github.com/jcpowermac/kubevirt-network-deepdive
cd kubevirt-network-deepdive/kubernetes/ingress
bash ingress.sh
After the script is complete confirm that ingress-nginx pods are running.
$ kubectl get pod -n ingress-nginx
NAME                                        READY     STATUS    RESTARTS   AGE
default-http-backend-55c6c69b88-jpl95       1/1       Running   0          1m
nginx-ingress-controller-85c8787886-vf5tp   1/1       Running   0          1m
KubeVirt Virtual Machines
Now, we are at a point where we can deploy our first KubeVirt virtual machines. These instances are where we will install our simple NodeJS and MongoDB application.
Create objects
Let’s create a clean new namespace to use.
$ kubectl create ns nodejs-ex
namespace "nodejs-ex" created
The nodejs-ex.yaml contains multiple objects. The definitions for our two virtual machines - mongodb and nodejs. Two Kubernetes Services and a one Kubernetes Ingress object. These instances will be created as offline virtual machines so after kubectl create we will start them up.
$ kubectl create -f https://raw.githubusercontent.com/jcpowermac/kubevirt-network-deepdive/master/kubernetes/nodejs-ex.yaml -n nodejs-ex
offlinevirtualmachine "nodejs" created
offlinevirtualmachine "mongodb" created
service "mongodb" created
service "nodejs" created
ingress "nodejs" created
Start the nodejs virtual machine
$ kubectl patch offlinevirtualmachine nodejs --type merge -p '{"spec":{"running":true}}' -n nodejs-ex
offlinevirtualmachine "nodejs" patched
Start the mongodb virtual machine
$ kubectl patch offlinevirtualmachine mongodb --type merge -p '{"spec":{"running":true}}' -n nodejs-ex
offlinevirtualmachine "mongodb" patched
Review kubevirt virtual machine objects
$ kubectl get ovms -n nodejs-ex
NAME      AGE
mongodb   7m
nodejs    7m

$ kubectl get vms -n nodejs-ex
NAME      AGE
mongodb   4m
nodejs    5m
Where are the virtual machines and what is their IP address?
$ kubectl get pod -o wide -n nodejs-ex
NAME                          READY     STATUS    RESTARTS   AGE       IP           NODE
virt-launcher-mongodb-qdpmg   2/2       Running   0          4m        10.244.2.7   kn2.virtomation.com
virt-launcher-nodejs-5r59c    2/2       Running   0          4m        10.244.1.8   kn1.virtomation.com
Note
To test virtual machine to virtual machine network connectivity I purposely set the host where which instance would run by using a nodeSelector.
Installing the NodeJS Example Application
To quickly deploy our example application Ansible project is included in the repository. Two inventory files need to be modified before executing ansible-playbook. Within all.yml change the analyzers IP address to what is listed in the command below.
$ kubectl get endpoints -n skydive
NAME               ENDPOINTS                                                      AGE
skydive-analyzer   10.244.1.2:9200,10.244.1.2:12379,10.244.1.2:8082 + 1 more...   18h
And finally use the IP Addresses from the kubectl get pod -o wide -n nodejs-ex command (example above) to modify inventory/hosts.ini. Now we can run ansible-playbook.
cd kubevirt-network-deepdive/ansible
vim inventory/group_vars/all.yml
vim inventory/hosts.ini

ansible-playbook -i inventory/hosts.ini playbook/main.yml
... output ...
Determine Ingress URL
First let’s find the host. This is defined within the Ingress object. In this case it is nodejs.ingress.virtomation.com.
$ kubectl get ingress -n nodejs-ex
NAME      HOSTS                            ADDRESS   PORTS     AGE
nodejs    nodejs.ingress.virtomation.com             80        22m
What are the NodePorts? For this installation Service spec was modified to include nodePort for http (30000) and http-mgmt (32000).
Note
When deploying ingress-nginx using the provided Service definition the nodePort is undefined. Kubernetes will assign a random port to ports defined in the spec.
$ kubectl get service ingress-nginx -n ingress-nginx
NAME            TYPE       CLUSTER-IP      EXTERNAL-IP   PORT(S)                                      AGE
ingress-nginx   NodePort   10.110.173.97   <none>        80:30000/TCP,443:30327/TCP,18080:32000/TCP   52m
What node is the nginx-ingress controller running on? This is needed to configure DNS.
$ kubectl get pod -n ingress-nginx -o wide
NAME                                        READY     STATUS    RESTARTS   AGE       IP           NODE
default-http-backend-55c6c69b88-jpl95       1/1       Running   0          53m       10.244.1.3   kn1.virtomation.com
nginx-ingress-controller-85c8787886-vf5tp   1/1       Running   0          53m       10.244.1.4   kn1.virtomation.com
Configure DNS
In my homelab I am using dnsmasq. To support ingress add the host where the controller is running as an A record.
[root@dns1 ~]# cat /etc/dnsmasq.d/virtomation.conf
... output ...
address=/km1.virtomation.com/172.31.50.221
address=/kn1.virtomation.com/172.31.50.231
address=/kn2.virtomation.com/172.31.50.232

# Needed for nginx-ingress
address=/.ingress.virtomation.com/172.31.50.231
... output ...
Restart dnsmasq for the new config
systemctl restart dnsmasq
Testing our application
This application uses MongoDB to store the views of the website. Listing the count-value shows that the database is connected and networking is functioning correctly.
$ curl http://nodejs.ingress.virtomation.com:30000/
<!doctype html>
<html lang="en">

...output...

<p>Page view count:
<span class="code" id="count-value">7</span>
</p>

...output...
KubeVirt Networking
Now that we shown that kubernetes, kubevirt, ingress-nginx and flannel work together how is it accomplished? First let’s go over what is going on in kubevirt specifically.
virt-launcher - virtwrap
virt-launcher is the pod that runs the necessary components instantiate and run a virtual machine. We are only going to concentrate on the network portion in this post.
virtwrap manager
Before the virtual machine is started the preStartHook will run SetupPodNetwork.
SetupPodNetwork → SetupDefaultPodNetwork
This function calls three functions that are detailed below discoverPodNetworkInterface, preparePodNetworkInterface and StartDHCP
discoverPodNetworkInterface
This function gathers the following information about the pod interface:
-
IP Address
-
Routes
-
Gateway
-
MAC address
This is stored for later use in configuring DHCP.
preparePodNetworkInterfaces
Once the current details of the pod interface have been stored following operations are performed:
-
Delete the IP address from the pod interface
-
Set the pod interface down
-
Change the pod interface MAC address
-
Set the pod interface up
-
Create the bridge
-
Add the pod interface to the bridge
This will provide libvirt a bridge to use for the virtual machine that will be created.
StartDHCP → DHCPServer → SingleClientDHCPServer
This DHCP server only provides a single address to a client in this case the virtual machine that will be started. The network details - the IP address, gateway, routes, DNS servers and suffixes are taken from the pod which will be served to the virtual machine.
Networking in detail
Now that we have a clearier picture of kubevirt networking we will continue with details regarding kubernetes objects, host, pod and virtual machine networking components. Then we will finish up with two scenarios: virtual machine to virtual machine communication and ingress to virtual machine.
Kubernetes-level
services
There are two services defined in the manifest that was deployed above. One each for mongodb and nodejs applications. This allows us to use the hostname mongodb to connect to MongoDB. Review DNS for Services and Pods for additional information.
$ kubectl get services -n nodejs-ex
NAME      TYPE        CLUSTER-IP       EXTERNAL-IP   PORT(S)     AGE
mongodb   ClusterIP   10.108.188.170   <none>        27017/TCP   3h
nodejs    ClusterIP   10.110.233.114   <none>        8080/TCP    3h
endpoints
The endpoints below were automatically created because there was a selector
spec:
  selector:
    kubevirt.io: virt-launcher
    kubevirt.io/domain: nodejs
defined in the Service object.
$ kubectl get endpoints -n nodejs-ex
NAME      ENDPOINTS          AGE
mongodb   10.244.2.7:27017   1h
nodejs    10.244.1.8:8080    1h
ingress
Also defined in the manifest was the ingress object. This will allow us to contact the NodeJS example application using a URL.
$ kubectl get ingress -n nodejs-ex
NAME      HOSTS                            ADDRESS   PORTS     AGE
nodejs    nodejs.ingress.virtomation.com             80        3h
Host-level
interfaces
A few important interfaces to note. The flannel.1 interface is type vxlan for connectivity between hosts. I removed from the ip a output the veth interfaces but the details are shown further below with bridge link show.
[root@kn1 ~]# ip a
...output...
2: eth0: <BROADCAST,MULTICAST,UP,LOWER_UP> mtu 1500 qdisc pfifo_fast state UP qlen 1000
    link/ether 52:54:00:97:a6:ee brd ff:ff:ff:ff:ff:ff
    inet 172.31.50.231/24 brd 172.31.50.255 scope global eth0
       valid_lft forever preferred_lft forever
    inet6 fe80::5054:ff:fe97:a6ee/64 scope link
       valid_lft forever preferred_lft forever
...output...
4: flannel.1: <BROADCAST,MULTICAST,UP,LOWER_UP> mtu 1450 qdisc noqueue state UNKNOWN
    link/ether ce:4e:fb:41:1d:af brd ff:ff:ff:ff:ff:ff
    inet 10.244.1.0/32 scope global flannel.1
       valid_lft forever preferred_lft forever
    inet6 fe80::cc4e:fbff:fe41:1daf/64 scope link
       valid_lft forever preferred_lft forever
5: cni0: <BROADCAST,MULTICAST,UP,LOWER_UP> mtu 1450 qdisc noqueue state UP qlen 1000
    link/ether 0a:58:0a:f4:01:01 brd ff:ff:ff:ff:ff:ff
    inet 10.244.1.1/24 scope global cni0
       valid_lft forever preferred_lft forever
    inet6 fe80::341b:eeff:fe06:7ec/64 scope link
       valid_lft forever preferred_lft forever
...output...
cni0 is a bridge where one side of the veth interface pair is attached.
[root@kn1 ~]# bridge link show
6: vethb4424886 state UP @docker0: <BROADCAST,MULTICAST,UP,LOWER_UP> mtu 1450 master cni0 state forwarding priority 32 cost 2
7: veth1657737b state UP @docker0: <BROADCAST,MULTICAST,UP,LOWER_UP> mtu 1450 master cni0 state forwarding priority 32 cost 2
8: vethdfd32c87 state UP @docker0: <BROADCAST,MULTICAST,UP,LOWER_UP> mtu 1450 master cni0 state forwarding priority 32 cost 2
9: vethed0f8c9a state UP @docker0: <BROADCAST,MULTICAST,UP,LOWER_UP> mtu 1450 master cni0 state forwarding priority 32 cost 2
10: veth05e4e005 state UP @docker0: <BROADCAST,MULTICAST,UP,LOWER_UP> mtu 1450 master cni0 state forwarding priority 32 cost 2
11: veth25933a54 state UP @docker0: <BROADCAST,MULTICAST,UP,LOWER_UP> mtu 1450 master cni0 state forwarding priority 32 cost 2
12: vethe3d701e7 state UP @docker0: <BROADCAST,MULTICAST,UP,LOWER_UP> mtu 1450 master cni0 state forwarding priority 32 cost 2
routes
The pod network subnet is 10.244.0.0/16 and broken up per host:
-
km1 -
10.244.0.0/24 -
kn1 -
10.244.1.0/24 -
kn2 -
10.244.2.0/24
So the table will route the packets to correct interface.
[root@kn1 ~]# ip r
default via 172.31.50.1 dev eth0
10.244.0.0/24 via 10.244.0.0 dev flannel.1 onlink
10.244.1.0/24 dev cni0 proto kernel scope link src 10.244.1.1
10.244.2.0/24 via 10.244.2.0 dev flannel.1 onlink
172.17.0.0/16 dev docker0 proto kernel scope link src 172.17.0.1
172.31.50.0/24 dev eth0 proto kernel scope link src 172.31.50.231
iptables
To also support kubernetes services kube-proxy writes iptables rules for those services. In the output below you can see our mongodb and nodejs services with destination NAT rules defined. For more information regarding iptables and services refer to debug-service in the kubernetes documentation.
[root@kn1 ~]# iptables -n -L -t nat | grep nodejs-ex
KUBE-MARK-MASQ  all  --  10.244.1.8           0.0.0.0/0            /* nodejs-ex/nodejs: */
DNAT       tcp  --  0.0.0.0/0            0.0.0.0/0            /* nodejs-ex/nodejs: */ tcp to:10.244.1.8:8080
KUBE-MARK-MASQ  all  --  10.244.2.7           0.0.0.0/0            /* nodejs-ex/mongodb: */
DNAT       tcp  --  0.0.0.0/0            0.0.0.0/0            /* nodejs-ex/mongodb: */ tcp to:10.244.2.7:27017
KUBE-MARK-MASQ  tcp  -- !10.244.0.0/16        10.108.188.170       /* nodejs-ex/mongodb: cluster IP */ tcp dpt:27017
KUBE-SVC-Z7W465PEPK7G2UVQ  tcp  --  0.0.0.0/0            10.108.188.170       /* nodejs-ex/mongodb: cluster IP */ tcp dpt:27017
KUBE-MARK-MASQ  tcp  -- !10.244.0.0/16        10.110.233.114       /* nodejs-ex/nodejs: cluster IP */ tcp dpt:8080
KUBE-SVC-LATB7COHB4ZMDCEC  tcp  --  0.0.0.0/0            10.110.233.114       /* nodejs-ex/nodejs: cluster IP */ tcp dpt:8080
KUBE-SEP-JOPA2J4R76O5OVH5  all  --  0.0.0.0/0            0.0.0.0/0            /* nodejs-ex/nodejs: */
KUBE-SEP-QD4L7MQHCIVOWZAO  all  --  0.0.0.0/0            0.0.0.0/0            /* nodejs-ex/mongodb: */
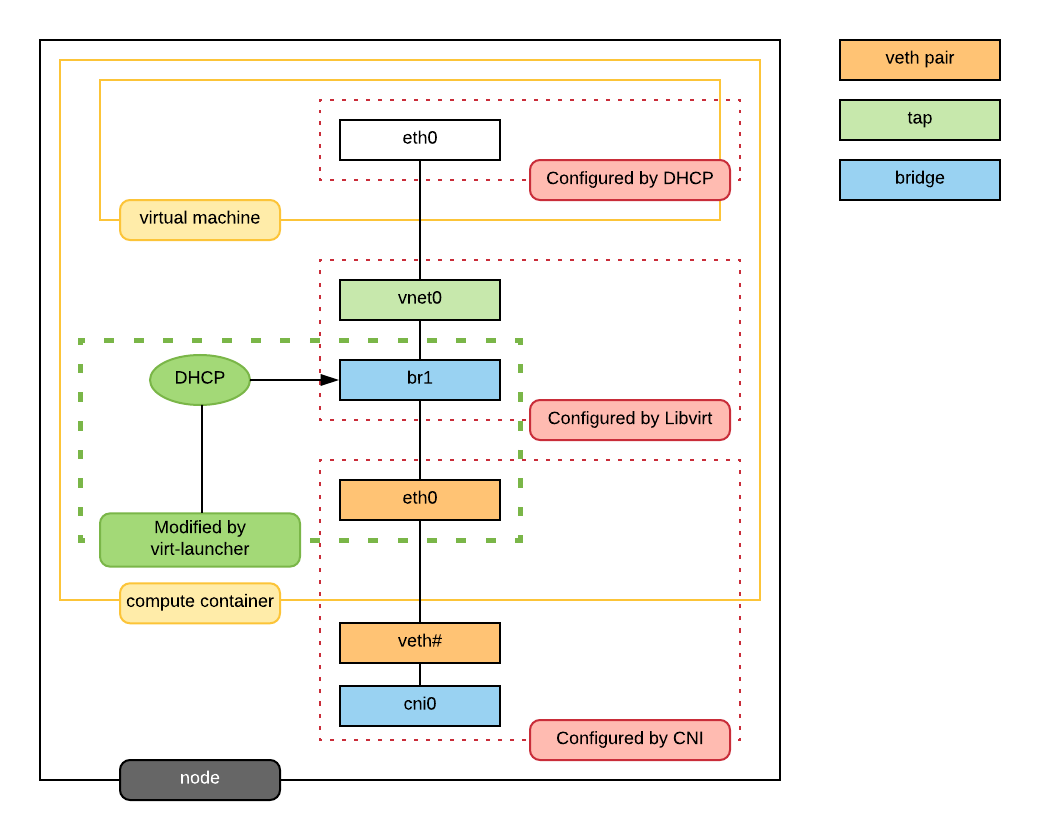
Pod-level
interfaces
The bridge br1 is the main focus in the pod level. It contains the eth0 and vnet0 ports. eth0 becomes the uplink to the bridge which is the other side of the veth pair which is a port on the host’s cni0 bridge.
Important
Since eth0 has no IP address and br1 is in the self-assigned range the pod has no network access. There are also no routes in the pod. This can be resolved for troubleshooting by creating a veth pair, adding one of the interfaces to the bridge and assigning an IP address in the pod subnet for the host. Routes are also required to be added. This is performed for running skydive in the pod see skydive.sh for more details.
$ kubectl exec -n nodejs-ex -c compute virt-launcher-nodejs-5r59c -- ip a
...output...
3: eth0@if12: <BROADCAST,MULTICAST,UP,LOWER_UP> mtu 1450 qdisc noqueue master br1 state UP group default
    link/ether a6:97:da:96:cf:07 brd ff:ff:ff:ff:ff:ff link-netnsid 0
    inet6 fe80::a497:daff:fe96:cf07/64 scope link
       valid_lft forever preferred_lft forever
4: br1: <BROADCAST,MULTICAST,UP,LOWER_UP> mtu 1450 qdisc noqueue state UP group default
    link/ether 32:8a:f5:59:10:02 brd ff:ff:ff:ff:ff:ff
    inet 169.254.75.86/32 brd 169.254.75.86 scope global br1
       valid_lft forever preferred_lft forever
    inet6 fe80::a497:daff:fe96:cf07/64 scope link
       valid_lft forever preferred_lft forever
5: vnet0: <BROADCAST,MULTICAST,UP,LOWER_UP> mtu 1450 qdisc pfifo_fast master br1 state UNKNOWN group default qlen 1000
    link/ether fe:58:0a:f4:01:08 brd ff:ff:ff:ff:ff:ff
    inet6 fe80::fc58:aff:fef4:108/64 scope link
       valid_lft forever preferred_lft forever
Showing the bridge br1 member ports.
$ kubectl exec -n nodejs-ex -c compute virt-launcher-nodejs-5r59c -- bridge link show
3: eth0 state UP @if12: <BROADCAST,MULTICAST,UP,LOWER_UP> mtu 1450 master br1 state forwarding priority 32 cost 2
5: vnet0 state UNKNOWN : <BROADCAST,MULTICAST,UP,LOWER_UP> mtu 1450 master br1 state forwarding priority 32 cost 100
DHCP
The virtual machine network is configured by DHCP. You can see virt-launcher has UDP port 67 open on the br1 interface to serve DHCP to the virtual machine.
$ kubectl exec -n nodejs-ex -c compute virt-launcher-nodejs-5r59c -- ss -tuapn
Netid  State    Recv-Q   Send-Q      Local Address:Port      Peer Address:Port
udp    UNCONN   0        0             0.0.0.0%br1:67             0.0.0.0:*      users:(("virt-launcher",pid=10,fd=12))
libvirt
With virsh domiflist we can also see that the vnet0 interface is a port on the br1 bridge.
$ kubectl exec -n nodejs-ex -c compute virt-launcher-nodejs-5r59c -- virsh domiflist nodejs-ex_nodejs
Interface  Type       Source     Model       MAC
vnet0      bridge     br1        e1000       0a:58:0a:f4:01:08
VM-level
interfaces
Fortunately the vm interfaces are fairly typical. Just the single interface that has been assigned the original pod ip address.
Warning
The MTU of the virtual machine interface is set to 1500. The network interfaces upstream are set to 1450.
[fedora@nodejs ~]$ ip a
...output...
2: eth0: <BROADCAST,MULTICAST,UP,LOWER_UP> mtu 1500 qdisc fq_codel state UP group default qlen 1000
    link/ether 0a:58:0a:f4:01:08 brd ff:ff:ff:ff:ff:ff
    inet 10.244.1.8/24 brd 10.244.1.255 scope global dynamic eth0
       valid_lft 86299761sec preferred_lft 86299761sec
    inet6 fe80::858:aff:fef4:108/64 scope link
       valid_lft forever preferred_lft forever
DNS
Just quickly wanted to cat the /etc/resolv.conf file to show that DNS is configured so that kube-dns will be properly queried.
[fedora@nodejs ~]$ cat /etc/resolv.conf
; generated by /usr/sbin/dhclient-script
search nodejs-ex.svc.cluster.local. svc.cluster.local. cluster.local.
nameserver 10.96.0.10
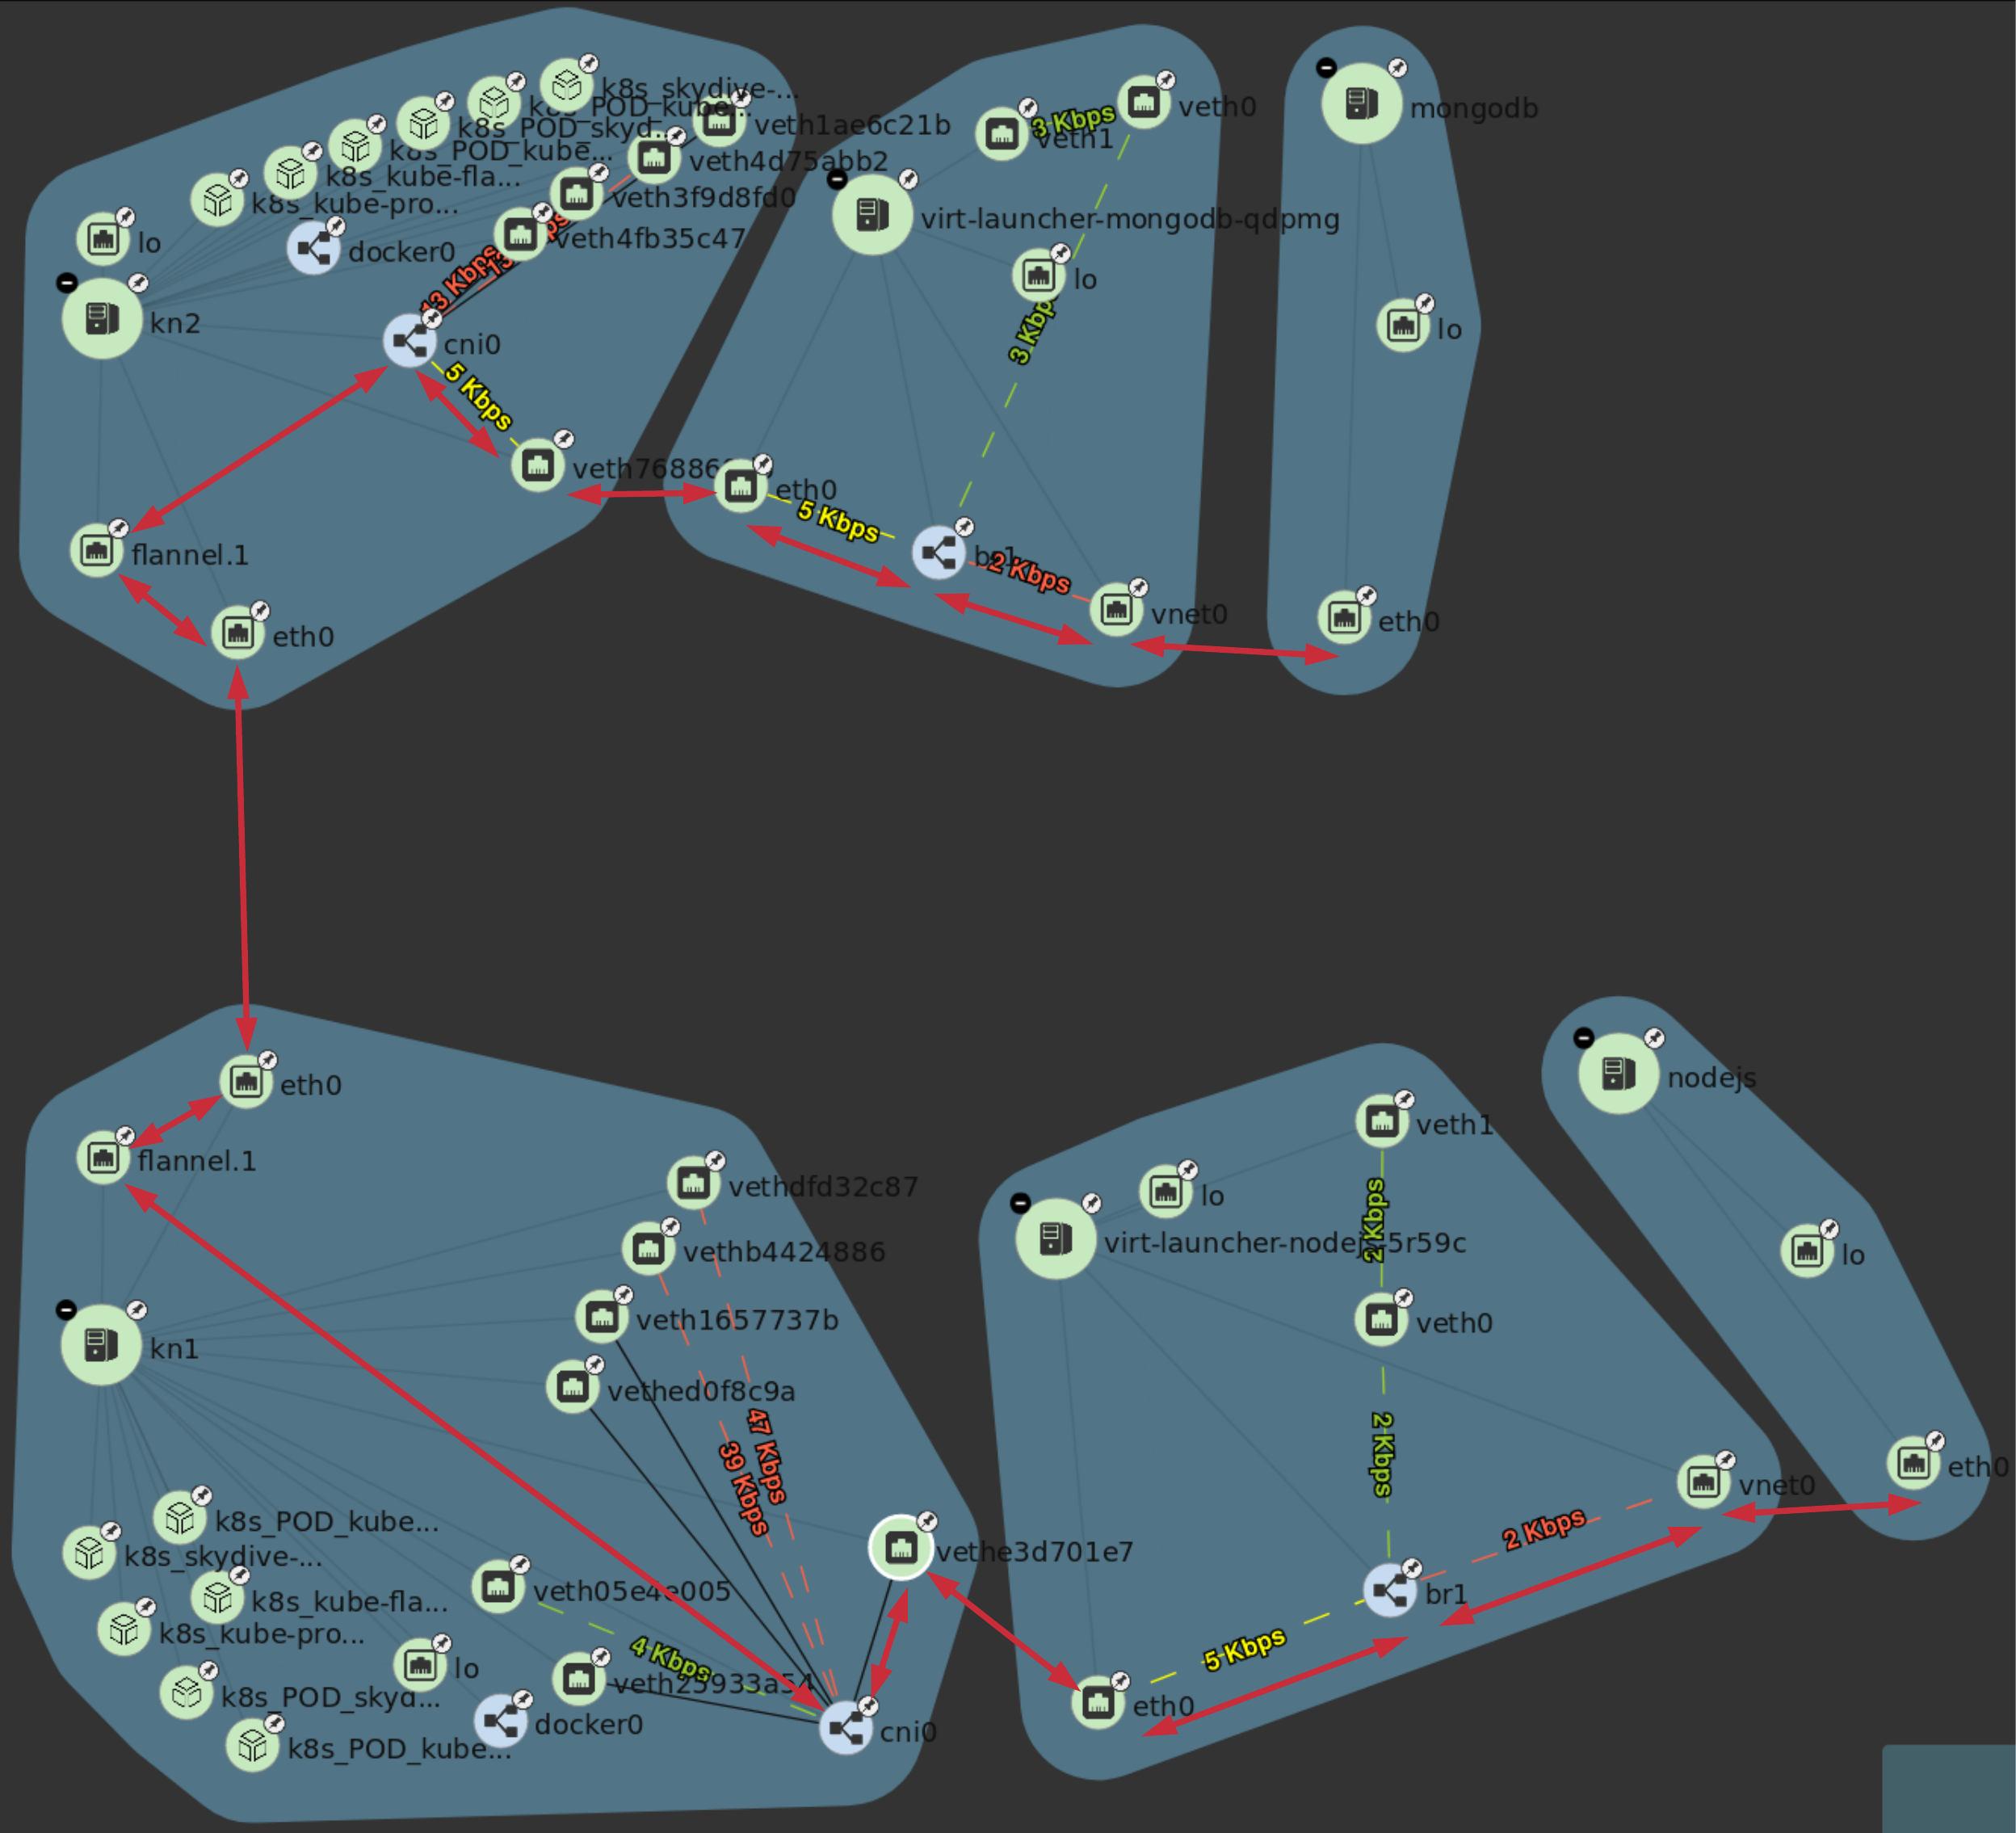
VM to VM communication
The virtual machines are on differnet hosts. This was done purposely to show that connectivity between virtual machine and hosts. Here we finally get to use Skydive. The real-time topology below along with arrows annotate the flow of packets between the host, pod and virtual machine network devices.
Connectivity Tests
To confirm connectivity we are going to do a few things. First check for DNS resolution for the mongodb service. Next look a established connection to MongoDB and finally check the NodeJS logs looking for confirmation of database connection.
DNS resolution
Service-based DNS resolution is an important feature of Kubernetes. Since dig,host or nslookup are not installed in our virtual machine a quick python script fills in. This output below shows that the mongodb name is available for resolution.
[fedora@nodejs ~]$ python3 -c "import socket;print(socket.gethostbyname('mongodb.nodejs-ex.svc.cluster.local'))"
10.108.188.170
[fedora@nodejs ~]$ python3 -c "import socket;print(socket.gethostbyname('mongodb'))"
10.108.188.170
TCP connection
After connecting to the nodejs virtual machine via ssh we can use ss to determine the current TCP connections. We are specifically looking for the established connections to the MongoDB service that is running on the mongodb virtual machine on node kn2.
[fedora@nodejs ~]$ ss -tanp
State      Recv-Q Send-Q                Local Address:Port                               Peer Address:Port
... output ...
LISTEN     0      128                               *:8080                                          *:*
ESTAB      0      0                        10.244.1.8:47826                            10.108.188.170:27017
ESTAB      0      0                        10.244.1.8:47824                            10.108.188.170:27017
... output ...
Logs
[fedora@nodejs ~]$ journalctl -u nodejs
...output..
Apr 18 20:07:37 nodejs.localdomain node[4303]: Connected to MongoDB at: mongodb://nodejs:nodejspassword@mongodb/nodejs
...output...
Ingress to VM communication
The topology image below shows the packet flow when using a ingress kubernetes object. The commands below the image will provide additional details.
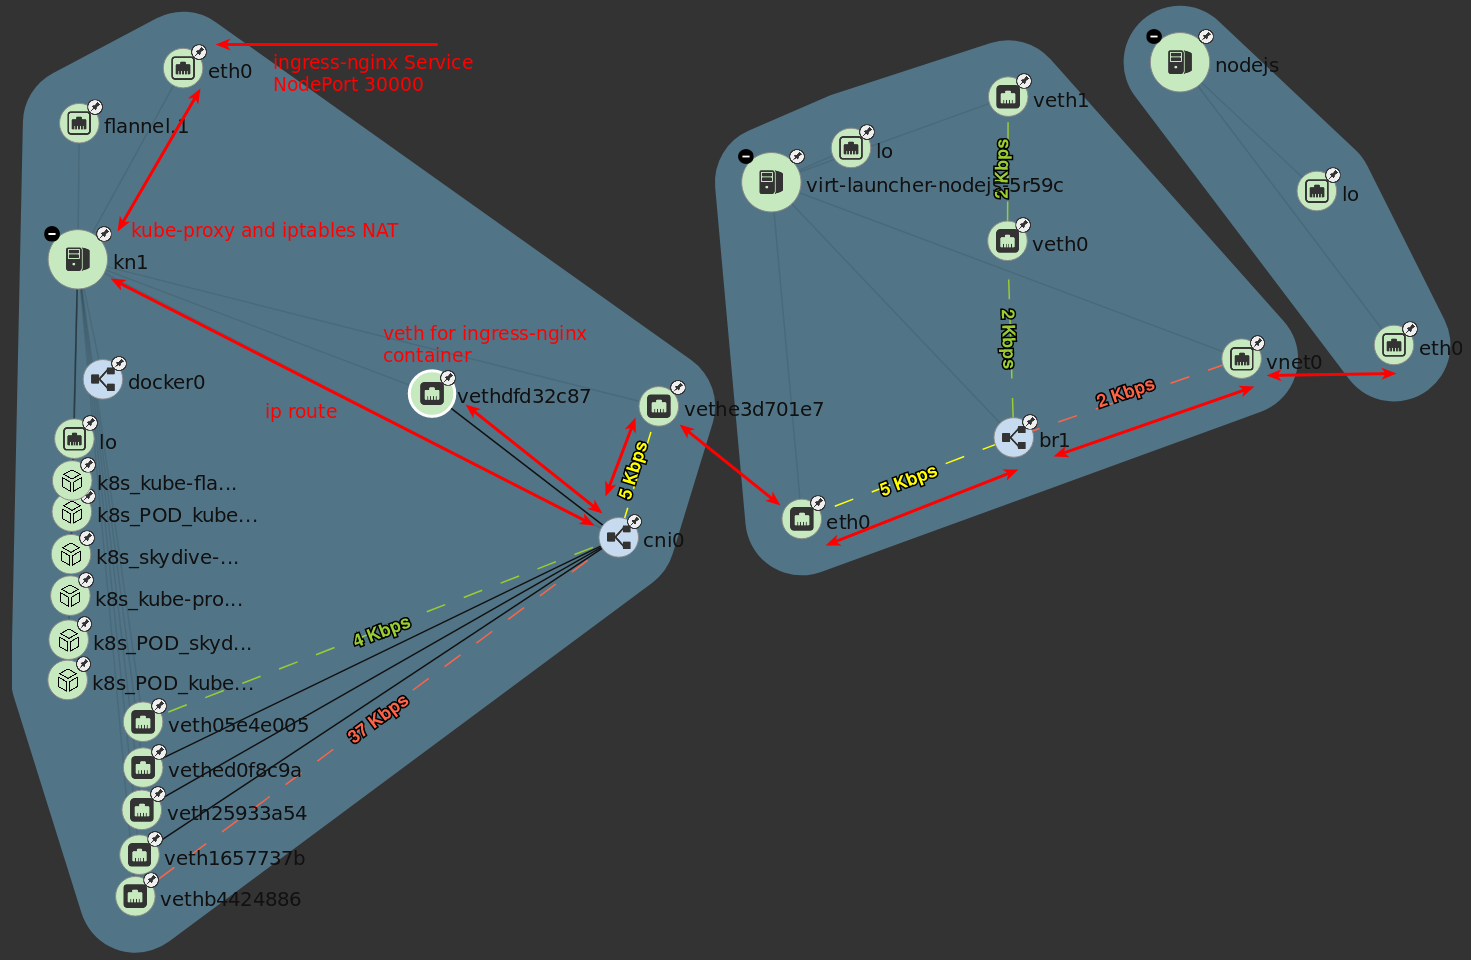
The kube-proxy has port 30000 open that was defined by the nodePort of the ingress-nginx service. Additional details on kube-proxy and iptables role is available from Service - IPs and VIPs in the Kubernetes documentation.
[root@kn1 ~]# ss -tanp | grep 30000
LISTEN     0      128         :::30000                   :::*                   users:(("kube-proxy",pid=6534,fd=13))

[root@kn1 ~]# iptables -n -L -t nat | grep ingress-nginx/ingress-nginx | grep http | grep -v https | grep -v http-mgmt
KUBE-MARK-MASQ  tcp  --  0.0.0.0/0            0.0.0.0/0            /* ingress-nginx/ingress-nginx:http */ tcp dpt:30000
KUBE-SVC-REQ4FPVT7WYF4VLA  tcp  --  0.0.0.0/0            0.0.0.0/0            /* ingress-nginx/ingress-nginx:http */ tcp dpt:30000
KUBE-MARK-MASQ  all  --  10.244.1.4           0.0.0.0/0            /* ingress-nginx/ingress-nginx:http */
DNAT       tcp  --  0.0.0.0/0            0.0.0.0/0            /* ingress-nginx/ingress-nginx:http */ tcp to:10.244.1.4:80
KUBE-MARK-MASQ  tcp  -- !10.244.0.0/16        10.110.173.97        /* ingress-nginx/ingress-nginx:http cluster IP */ tcp dpt:80
KUBE-SVC-REQ4FPVT7WYF4VLA  tcp  --  0.0.0.0/0            10.110.173.97        /* ingress-nginx/ingress-nginx:http cluster IP */ tcp dpt:80
KUBE-SEP-BKJT4JXHZ3TCOTKA  all  --  0.0.0.0/0            0.0.0.0/0            /* ingress-nginx/ingress-nginx:http */
Since the ingress-nginx pod is on the same host as the nodejs virtual machine we just need to be routed to the cni0 bridge to communicate with the pod and vm.
[root@kn1 ~]# ip r
...output...
10.244.1.0/24 dev cni0 proto kernel scope link src 10.244.1.1
...output...
Connectivity Tests
In the section where we installed the application we already tested for connectivity but let’s take this is little further to confirm.
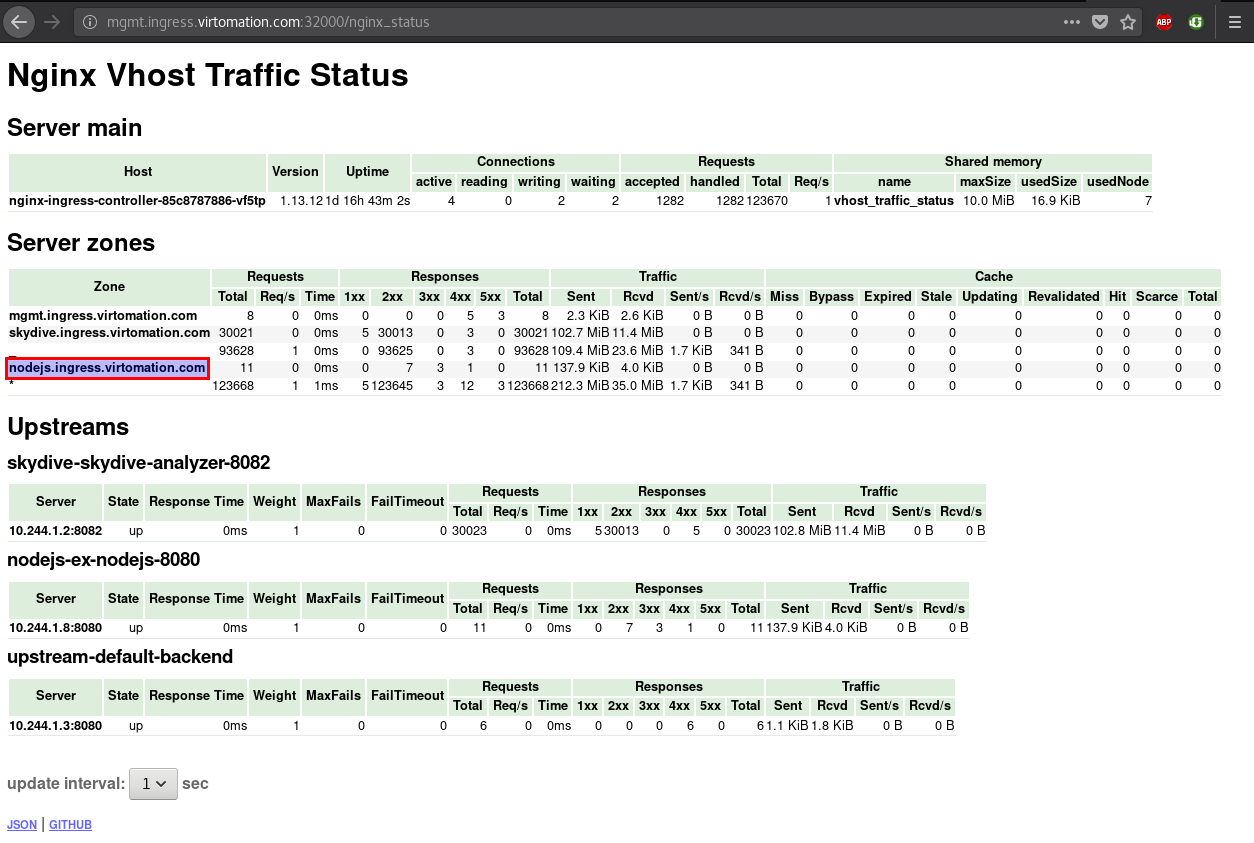
Nginx Vhost Traffic Status
ingress-nginx provides an optional setting to enable traffic status - which we already enabled. The screenshot below shows the requests that Nginx is receiving for nodejs.ingress.virtomation.com.
Service NodePort to Nginx Pod
My tcpdump fu is lacking so I found an example query that will provide the details we are looking for. I removed a significant amount of the content but you can see my desktop (172.31.51.52) create a GET request to the NodePort 30000. This could have also been done in Skydive but I wanted to provide an alternative if you didn’t want to install it or just stick to the cli.
# tcpdump -nni eth0 -A -s 0 'tcp port 30000 and (((ip[2:2] - ((ip[0]&0xf)<<2)) - ((tcp[12]&0xf0)>>2)) != 0)'

...output...

13:24:52.197092 IP 172.31.51.52.36494 > 172.31.50.231.30000: Flags [P.], seq 2685726663:2685727086, ack 277056091, win 491, options [nop,nop,TS val 267689990 ecr 151714950], length 423
E... .@.?.Z...34..2...u0.......[....r......
....
..GET / HTTP/1.1
Host: nodejs.ingress.virtomation.com:30000
User-Agent: Mozilla/5.0 (X11; Fedora; Linux x86_64; rv:59.0) Gecko/20100101 Firefox/59.0
Accept: text/html,application/xhtml+xml,application/xml;q=0.9,*/*;q=0.8
Accept-Language: en-US,en;q=0.5
Accept-Encoding: gzip, deflate
Connection: keep-alive
Upgrade-Insecure-Requests: 1
If-None-Match: W/"9edb-O5JGhneli0eCE6G2kFY5haMKg5k"
Cache-Control: max-age=0


13:24:52.215284 IP 172.31.50.231.30000 > 172.31.51.52.36494: Flags [P.], seq 1:2362, ack 423, win 236, options [nop,nop,TS val 151723713 ecr 267689990], length 2361
E.      m|.@.?.....2...34u0.....[...n...........
        .......HTTP/1.1 200 OK
        Server: nginx/1.13.12
        Date: Fri, 20 Apr 2018 13:24:52 GMT
        Content-Type: text/html; charset=utf-8
        Transfer-Encoding: chunked
        Connection: keep-alive
        Vary: Accept-Encoding
        X-Powered-By: Express
        ETag: W/"9edb-SZeP35LuygZ9MOrPTIySYOu9sAE"
        Content-Encoding: gzip
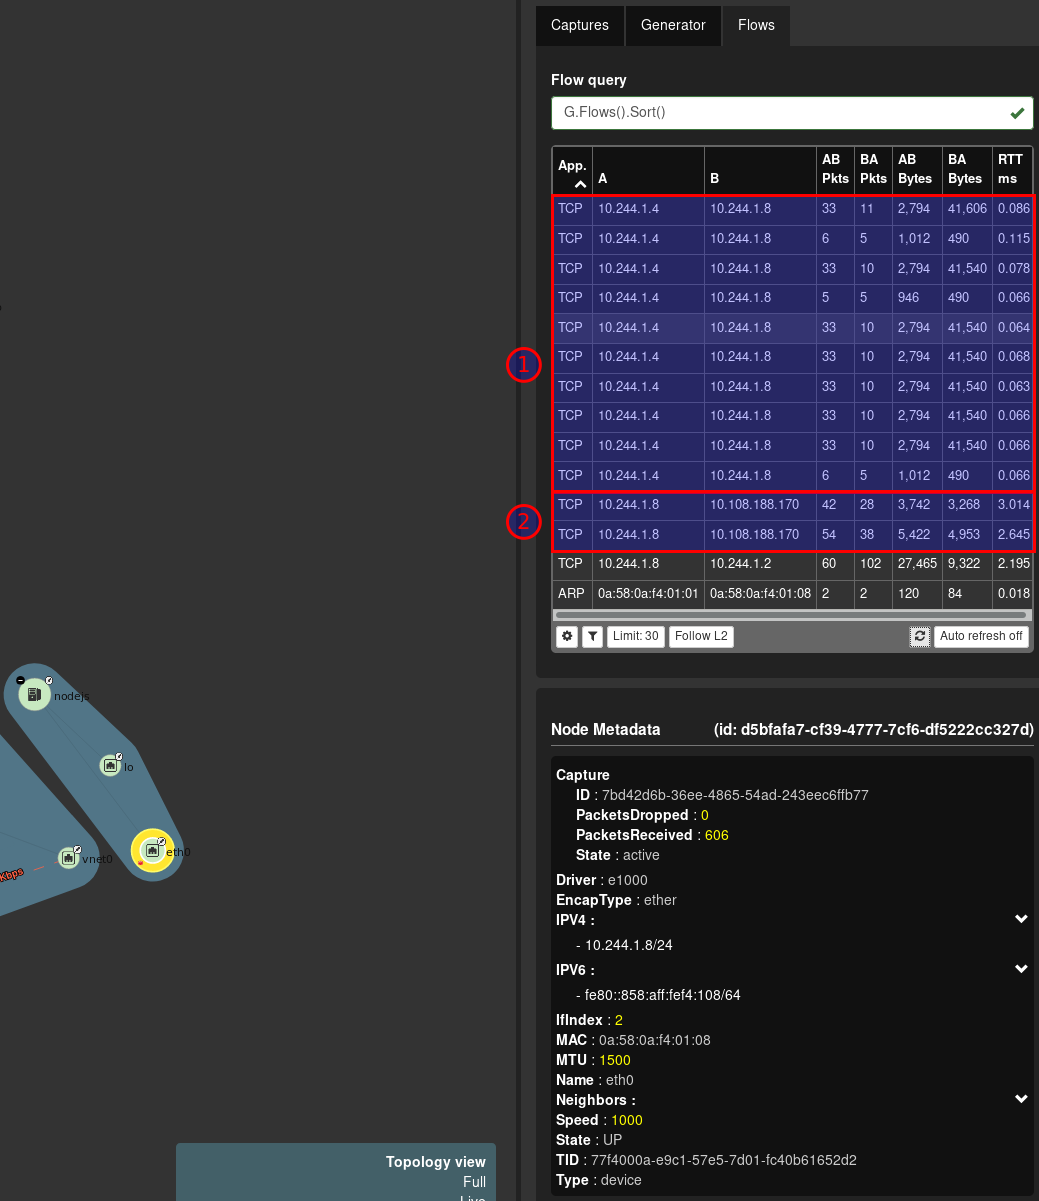
Nginx Pod to NodeJS VM
In (1) we can see flows to and from 10.244.1.4 and 10.244.1.8. .8 is the nodejs virtual machine and .4 is as listed below the nginx-ingress-controller.
$ kubectl get pod --all-namespaces -o wide
NAMESPACE       NAME                                          READY     STATUS    RESTARTS   AGE       IP              NODE
...output...
ingress-nginx   nginx-ingress-controller-85c8787886-vf5tp     1/1       Running   0          1d        10.244.1.4      kn1.virtomation.com
...output...
Final Thoughts
We have went through quite a bit in this deep dive from installation, KubeVirt specific networking details and kubernetes, host, pod and virtual machine level configurations. Finishing up with the packet flow between virtual machine to virtual machine and ingress to virtual machine.