Using Intel vGPUs with Kubevirt
- Introduction
- Prerequisites
- Install Kubernetes with minikube
- Install kubevirt
- Install Windows
- Accessing the Windows VM
- Using the GPU
Introduction
Graphical User Interfaces (GUIs) have come along way over the past few years and most modern desktop environments expect some form of GPU acceleration in order to give you a seamless user experience. If you have tried running things like Windows 10 within Kubevirt you may have noticed that the desktop experience felt a little slow. This is due to Windows 10 reliance on GPU acceleration. In addition many applications are also now taking advantage of GPU acceleration and it can even be used in web based applications such as “FishGL”:
Without GPU hardware acceleration the user experience of a Virtual machine can be greatly impacted.
Starting with 5th generation Intel Core processors that have embedded Intel graphics processing units it is possible to share the graphics processor between multiple virtual machines. In Linux, this sharing of a GPU is typically enabled through the use of mediated GPU devices, also known as vGPUs. Kubevirt has supported the use of GPUs including GPU passthrough and vGPU since v0.22.0 back in 2019. This support was centered around one specific vendor, and only worked with expensive enterprise class cards and required additional licensing. Starting with Kubevirt 0.40 support for detecting and allocating the Intel based vGPUs has been added to Kubevirt. Support for the creation of these virtualized Intel GPUs is available in the Linux Kernel since the 4.19 release. What does this meaning for you? You no longer need additional drivers or licenses to test out GPU accelerated virtual machines.
The total number of Intel vGPUs you can create is dependent on your specific hardware as well as support for changing the Graphics aperture size and shared graphics memory within your BIOS. For more details on this see Create vGPU (KVMGT only) in the Intel GVTg wiki. Minimally configured devices can typically make at least two vGPU devices.
You can reproduce this work on any Kubernetes cluster running kubevirt v0.40.0 or later, but the steps you need to take to load the kernel modules and enable the virtual devices will vary based on the underlying OS your Kubernetes cluster is running on. In order to demonstrate how you can enable this feature, we will use an all-in-one Kubernetes cluster built using Fedora 32 and minikube.
Note
This blog post is a more advanced topic and assumes some Linux and Kubernetes understanding.
Prerequisites
Before we begin you will need a few things to make use of the Intel GPU:
- A workstation or server with a 5th Generation or higher Intel Core Processor, or E3_v4 or higher Xeon Processor and enough memory to virtualize one or more VMs
- A preinstalled Fedora 32 Workstation with at least 50Gb of free space in the “/” filesystem
- The following software:
- minikube - See minikube start
- virtctl - See kubevirt releases
- kubectl - See Install and Set Up kubectl on Linux
- A Windows 10 Install ISO Image - See Download Windows 10 Disk Image
Fedora Workstation Prep
In order to use minikube on Fedora 32 we will be installing multiple applications that will be used throughout this demo. In addition we will be configuring the workstation to use cgroups v1 and we will be updating the firewall to allow proper communication to our Kubernetes cluster as well as any hosted applications. Finally we will be disabling SELinux per the minikube bare-metal install instructions:
Note
This post assumes that we are starting with a fresh install of Fedora 32. If you are using an existing configured Fedora 32 Workstation, you may have some software conflicts.
sudo dnf update -y
sudo dnf install -y pciutils podman podman-docker conntrack tigervnc rdesktop
sudo grubby --update-kernel=ALL --args="systemd.unified_cgroup_hierarchy=0"
# Setup firewall rules to allow inbound and outbound connections from your minikube cluster
sudo firewall-cmd --add-port=30000-65535/tcp --permanent
sudo firewall-cmd --add-port=30000-65535/udp --permanent
sudo firewall-cmd --add-port=10250-10252/tcp --permanent
sudo firewall-cmd --add-port=10248/tcp --permanent
sudo firewall-cmd --add-port=2379-2380/tcp --permanent
sudo firewall-cmd --add-port=6443/tcp --permanent
sudo firewall-cmd --add-port=8443/tcp --permanent
sudo firewall-cmd --add-port=9153/tcp --permanent
sudo firewall-cmd --add-service=dns --permanent
sudo firewall-cmd --add-interface=cni-podman0 --permanent
sudo firewall-cmd --add-masquerade --permanent
sudo vi /etc/selinux/config
# change the "SELINUX=enforcing" to "SELINUX=permissive"
sudo setenforce 0
sudo systemctl enable sshd --now
We will now install the CRIO runtime:
sudo dnf module enable -y cri-o:1.18
sudo dnf install -y cri-o cri-tools
sudo systemctl enable --now crio
Preparing the Intel vGPU driver
In order to make use of the Intel vGPU driver, we need to make a few changes to our all-in-one host. The commands below assume you are using a Fedora based host. If you are using a different base OS, be sure to update your commands for that specific distribution.
The following commands will do the following:
- load the kvmgt module to enable support within kvm
- enable gvt in the i915 module
- update the Linux kernel to enable Intel IOMMU
sudo sh -c "echo kvmgt > /etc/modules-load.d/gpu-kvmgt.conf"
sudo grubby --update-kernel=ALL --args="intel_iommu=on i915.enable_gvt=1"
sudo shutdown -r now
After the reboot check to ensure that the proper kernel modules have been loaded:
$ sudo lsmod | grep kvmgt
kvmgt                  32768  0
mdev                   20480  2 kvmgt,vfio_mdev
vfio                   32768  3 kvmgt,vfio_mdev,vfio_iommu_type1
kvm                   798720  2 kvmgt,kvm_intel
i915                 2494464  4 kvmgt
drm                   557056  4 drm_kms_helper,kvmgt,i915
We will now create our vGPU devices. These virtual devices are created by echoing a GUID into a sys device created by the Intel driver. This needs to be done every time the system boots. The easiest way to do this is using a systemd service that runs on every boot. Before we create this systemd service, we need to validate the PCI ID of your Intel Graphics card. To do this we will use the lspci command
$ sudo lspci
00:00.0 Host bridge: Intel Corporation Device 9b53 (rev 03)
00:02.0 VGA compatible controller: Intel Corporation Device 9bc8 (rev 03)
00:08.0 System peripheral: Intel Corporation Xeon E3-1200 v5/v6 / E3-1500 v5 / 6th/7th/8th Gen Core Processor Gaussian Mixture Model
Take note that in the above output the Intel GPU is on “00:02.0”. Now create the /etc/systemd/system/gvtg-enable.service but be sure to update the PCI ID as appropriate for your machine:
cat > ~/gvtg-enable.service << EOF
[Unit]
Description=Create Intel GVT-g vGPU

[Service]
Type=oneshot
ExecStart=/bin/sh -c "echo '56a4c4e2-c81f-4cba-82bf-af46c30ea32d' > /sys/devices/pci0000:00/0000:00:02.0/mdev_supported_types/i915-GVTg_V5_8/create"
ExecStart=/bin/sh -c "echo '973069b7-2025-406b-b3c9-301016af3150' > /sys/devices/pci0000:00/0000:00:02.0/mdev_supported_types/i915-GVTg_V5_8/create"
ExecStop=/bin/sh -c "echo '1' > /sys/devices/pci0000:00/0000:00:02.0/56a4c4e2-c81f-4cba-82bf-af46c30ea32d/remove"
ExecStop=/bin/sh -c "echo '1' > /sys/devices/pci0000:00/0000:00:02.0/973069b7-2025-406b-b3c9-301016af3150/remove"
RemainAfterExit=yes

[Install]
WantedBy=multi-user.target
EOF
sudo mv ~/gvtg-enable.service /etc/systemd/system/gvtg-enable.service
sudo systemctl enable gvtg-enable --now
Note
The above systemd service will create two vGPU devices, you can repeat the commands with additional unique GUIDs up to a maximum of 8 vGPU if your particular hardware supports it.
We can validate that the vGPU devices were created by looking in the /sys/devices/pci0000:00/0000:00:02.0/ directory.
$ ls -lsa /sys/devices/pci0000:00/0000:00:02.0/56a4c4e2-c81f-4cba-82bf-af46c30ea32d
total 0
lrwxrwxrwx. 1 root root    0 Apr 20 13:56 driver -> ../../../../bus/mdev/drivers/vfio_mdev
drwxr-xr-x. 2 root root    0 Apr 20 14:41 intel_vgpu
lrwxrwxrwx. 1 root root    0 Apr 20 14:41 iommu_group -> ../../../../kernel/iommu_groups/8
lrwxrwxrwx. 1 root root    0 Apr 20 14:41 mdev_type -> ../mdev_supported_types/i915-GVTg_V5_8
drwxr-xr-x. 2 root root    0 Apr 20 14:41 power
--w-------. 1 root root 4096 Apr 20 14:41 remove
lrwxrwxrwx. 1 root root    0 Apr 20 13:56 subsystem -> ../../../../bus/mdev
-rw-r--r--. 1 root root 4096 Apr 20 13:56 uevent
Note that “mdev_type” points to “i915-GVTg_V5_8”, this will come into play later when we configure kubevirt to detect the vGPU.
Install Kubernetes with minikube
We will now install Kubernetes onto our Fedora Workstation. Minikube will help quickly set up our Kubernetes cluster environment. We will start by getting the latest release of minikube and kubectl.
curl -LO https://storage.googleapis.com/minikube/releases/latest/minikube-linux-amd64
sudo install minikube-linux-amd64 /usr/local/bin/minikube
VERSION=$(minikube kubectl version | head -1 | awk -F', ' {'print $3'} | awk -F':' {'print $2'} | sed s/\"//g)
sudo install ${HOME}/.minikube/cache/linux/${VERSION}/kubectl /usr/local/bin
We will be using the minikube driver “none” which will install Kubernetes directly onto this machine. This will allow you to maintain a copy of the virtual machines that you build through a reboot. Later in this post we will create persistent volumes for virtual machine storage in “/data”. As previously noted, ensure that you have at least 50Gb of free space in “/data” to complete this setup. The minikube install will take a few minutes to complete.
$ sudo mkdir -p /data/winhd1-pv
$ sudo minikube start --driver=none --container-runtime=crio
😄  minikube v1.19.0 on Fedora 32
✨  Using the none driver based on user configuration
👍  Starting control plane node minikube in cluster minikube
🤹  Running on localhost (CPUs=12, Memory=31703MB, Disk=71645MB) ...
ℹ️  OS release is Fedora 32 (Workstation Edition)
🐳  Preparing Kubernetes v1.20.2 on Docker 20.10.6 ...
    ▪ Generating certificates and keys ...
    ▪ Booting up control plane ...
    ▪ Configuring RBAC rules ...
🤹  Configuring local host environment ...
🔎  Verifying Kubernetes components...
    ▪ Using image gcr.io/k8s-minikube/storage-provisioner:v5
🌟  Enabled addons: storage-provisioner, default-storageclass
🏄  Done! kubectl is now configured to use "minikube" cluster and "default" namespace by default
In order to make our interaction with Kubernetes a little easier, we will need to copy some files and update our .kube/config
mkdir -p ~/.minikube/profiles/minikube
sudo cp -r /root/.kube /home/$USER
sudo cp /root/.minikube/ca.crt /home/$USER/.minikube/ca.crt
sudo cp /root/.minikube/profiles/minikube/client.crt /home/$USER/.minikube/profiles/minikube
sudo cp /root/.minikube/profiles/minikube/client.key /home/$USER/.minikube/profiles/minikube
sudo chown -R $USER:$USER /home/$USER/.kube
sudo chown -R $USER:$USER /home/$USER/.minikube
sed -i  "s/root/home\/$USER/" ~/.kube/config
Once the minikube install is complete, validate that everything is working properly.
$ kubectl get nodes
NAME       STATUS   ROLES                  AGE    VERSION
kubevirt   Ready    control-plane,master   4m5s   v1.20.2
As long as you don’t get any errors, your base Kubernetes cluster is ready to go.
Install kubevirt
Our all-in-one Kubernetes cluster is now ready for installing Installing Kubevirt. Using the minikube addons manager, we will install kubevirt into our cluster:
sudo minikube addons enable kubevirt
kubectl -n kubevirt wait kubevirt kubevirt --for condition=Available --timeout=300s
At this point, we need to update our instance of kubevirt in the cluster. We need to configure kubevirt to detect the Intel vGPU by giving it an mdevNameSelector to look for, and a resourceName to assign to it. The mdevNameSelector comes from the “mdev_type” that we identified earlier when we created the two virtual GPUs. When the kubevirt device manager finds instances of this mdev type, it will record this information and tag the node with the identified resourceName. We will use this resourceName later when we start up our virtual machine.
cat > kubevirt-patch.yaml << EOF
spec:
  configuration:
    developerConfiguration:
      featureGates:
      - GPU
    permittedHostDevices:
      mediatedDevices:
      - mdevNameSelector: "i915-GVTg_V5_8"
        resourceName: "intel.com/U630"
EOF
kubectl patch kubevirt kubevirt -n kubevirt --patch "$(cat kubevirt-patch.yaml)" --type=merge
We now need to wait for kubevirt to reload its configuration.
Validate vGPU detection
Now that kubevirt is installed and running, lets ensure that the vGPU was identified correctly. Describe the minikube node, using the command kubectl describe node and look for the “Capacity” section. If kubevirt properly detected the vGPU you will see an entry for “intel.com/U630” with a capacity value of greater than 0.
$ kubectl describe node
Name:               kubevirt
Roles:              control-plane,master
Labels:             beta.kubernetes.io/arch=amd64
                    beta.kubernetes.io/os=linux
...
Capacity:
  cpu:                            12
  devices.kubevirt.io/kvm:        110
  devices.kubevirt.io/tun:        110
  devices.kubevirt.io/vhost-net:  110
  ephemeral-storage:              71645Mi
  hugepages-1Gi:                  0
  hugepages-2Mi:                  0
  intel.com/U630:                 2
  memory:                         11822640Ki
  pods:                           110
There it is, intel.com/U630 - two of them are available. Now all we need is a virtual machine to consume them.
Install Containerize Data Importer
In order to install Windows 10, we are going to need to upload a Windows 10 install ISO to the cluster. This can be facilitated through the use of the Containerized Data Importer. The following steps are taken from the Experiment with the Containerized Data Importer (CDI) web page:
export VERSION=$(curl -s https://github.com/kubevirt/containerized-data-importer/releases/latest | grep -o "v[0-9]\.[0-9]*\.[0-9]*")
kubectl create -f https://github.com/kubevirt/containerized-data-importer/releases/download/$VERSION/cdi-operator.yaml
kubectl create -f https://github.com/kubevirt/containerized-data-importer/releases/download/$VERSION/cdi-cr.yaml
kubectl -n cdi wait cdi cdi --for condition=Available --timeout=300s
Now that our CDI is available, we will expose it for consumption using a nodePort. This will allow us to connect to the cdi-proxy in the next steps.
cat > cdi-nodeport.yaml << EOF
apiVersion: v1
kind: Service
metadata:
  name: cdi-proxy-nodeport
  namespace: cdi
spec:
  type: NodePort
  selector:
    cdi.kubevirt.io: cdi-uploadproxy
  ports:
    - port: 8443
      nodePort: 30443
EOF
kubectl create -f cdi-nodeport.yaml
One final step, lets get the latest release of virtctl which we will be using as we install Windows.
VERSION=$(kubectl get kubevirt.kubevirt.io/kubevirt -n kubevirt -o=jsonpath="{.status.observedKubeVirtVersion}")
curl -L -o virtctl https://github.com/kubevirt/kubevirt/releases/download/${VERSION}/virtctl-${VERSION}-linux-amd64
sudo install virtctl /usr/local/bin
Install Windows
At this point we can now install a Windows VM in order to test this feature. The steps below are based on KubeVirt: installing Microsoft Windows from an ISO however we will be using Windows 10 instead of Windows Server 2012. The commands below assume that you have a Windows 10 ISO file called win10-virtio.iso. If you need a Windows 10 CD, please see Download Windows 10 Disk Image and come back here after you have obtained your install CD.
$ virtctl image-upload \
   --image-path=win10-virtio.iso \
   --pvc-name=iso-win10 \
   --access-mode=ReadWriteOnce \
   --pvc-size=6G \
   --uploadproxy-url=https://127.0.0.1:30443 \
   --insecure \
   --wait-secs=240
We need a place to store our Windows 10 virtual disk, use the following to create a 40Gb space to store our file. In order to do this within minikube we will manually create a PersistentVolume (PV) as well as a PersistentVolumeClaim (PVC). These steps assume that you have 45+ GiB of free space in “/”. We will create a “/data” directory as well as a subdirectory for storing our PV. If you do not have at least 45 GiB of free space in “/”, you will need to free up space, or mount storage on “/data” to continue.
cat > win10-pvc.yaml << EOF
---
apiVersion: v1
kind: PersistentVolume
metadata:
  name: pvwinhd1
spec:
  accessModes:
    - ReadWriteOnce
  capacity:
    storage: 43Gi
  claimRef:
    namespace: default
    name: winhd1
  hostPath:
    path: /data/winhd1-pv
---
apiVersion: v1
kind: PersistentVolumeClaim
metadata:
  name: winhd1
spec:
  accessModes:
    - ReadWriteOnce
  resources:
    requests:
      storage: 40Gi
EOF
kubectl create -f win10-pvc.yaml
We can now create our Windows 10 virtual machine. Use the following to create a virtual machine definition file that includes a vGPU:
cat > win10vm1.yaml << EOF
apiVersion: kubevirt.io/v1alpha3
kind: VirtualMachine
metadata:
  name: win10vm1
spec:
  runStrategy: Halted
  template:
    metadata:
      creationTimestamp: null
      labels:
        kubevirt.io/domain: win10vm1
    spec:
      domain:
        clock:
          timer:
            hpet:
              present: false
            hyperv: {}
            pit:
              tickPolicy: delay
            rtc:
              tickPolicy: catchup
          utc: {}
        cpu:
          cores: 1
          sockets: 2
          threads: 1
        devices:
          gpus:
          - deviceName: intel.com/U630
            name: gpu1
          disks:
          - cdrom:
              bus: sata
            name: windows-guest-tools
          - bootOrder: 1
            cdrom:
              bus: sata
            name: cdrom
          - bootOrder: 2
            disk:
              bus: sata
            name: disk-1
          inputs:
          - bus: usb
            name: tablet
            type: tablet
          interfaces:
          - masquerade: {}
            model: e1000e
            name: nic-0
        features:
          acpi: {}
          apic: {}
          hyperv:
            relaxed: {}
            spinlocks:
              spinlocks: 8191
            vapic: {}
        machine:
          type: pc-q35-rhel8.2.0
        resources:
          requests:
            memory: 8Gi
      hostname: win10vm1
      networks:
      - name: nic-0
        pod: {}
      terminationGracePeriodSeconds: 3600
      volumes:
        - name: cdrom
          persistentVolumeClaim:
            claimName: iso-win10
        - name: disk-1
          persistentVolumeClaim:
            claimName: winhd1
        - containerDisk:
            image: quay.io/kubevirt/virtio-container-disk
          name: windows-guest-tools
EOF
kubectl create -f win10vm1.yaml
NOTE
This VM is not optimized to use virtio devices to simplify the OS install. By using SATA devices as well as an emulated e1000 network card, we do not need to worry about loading additional drivers.
The key piece of information that we have added to this virtual machine definition is this snippet of yaml:
        devices:
          gpus:
          - deviceName: intel.com/U630
            name: gpu1
Here we are identifying the gpu device that we want to attach to this VM. The deviceName relates back to the name that we gave to kubevirt to identify the Intel GPU resources. It also is the same identifier that shows up in the “Capacity” section of a node when you run kubectl describe node.
We can now start the virtual machine:
virtctl start win10vm1
kubectl get vmi --watch
When the output of shows that the vm is in a “Running” phase you can “CTRL+C” to end the watch command.
Accessing the Windows VM
Since we are running this VM on this local machine, we can now take advantage of the virtctl command to connect to the VNC console of the virtual machine.
virtctl vnc win10vm1
A new VNC Viewer window will open and you should now see the Windows 10 install screen. Follow standard Windows 10 install steps at this point.
Once the install is complete you have a Windows 10 VM running with a GPU available. You can test that GPU acceleration is available by opening the Windows 10 task manager, selecting Advanced and then select the “Performance” tab. Note that the first time you start up, Windows is still detecting and installing the appropriate drivers. It may take a minute or two for the GPU information to show up in the Performance tab.
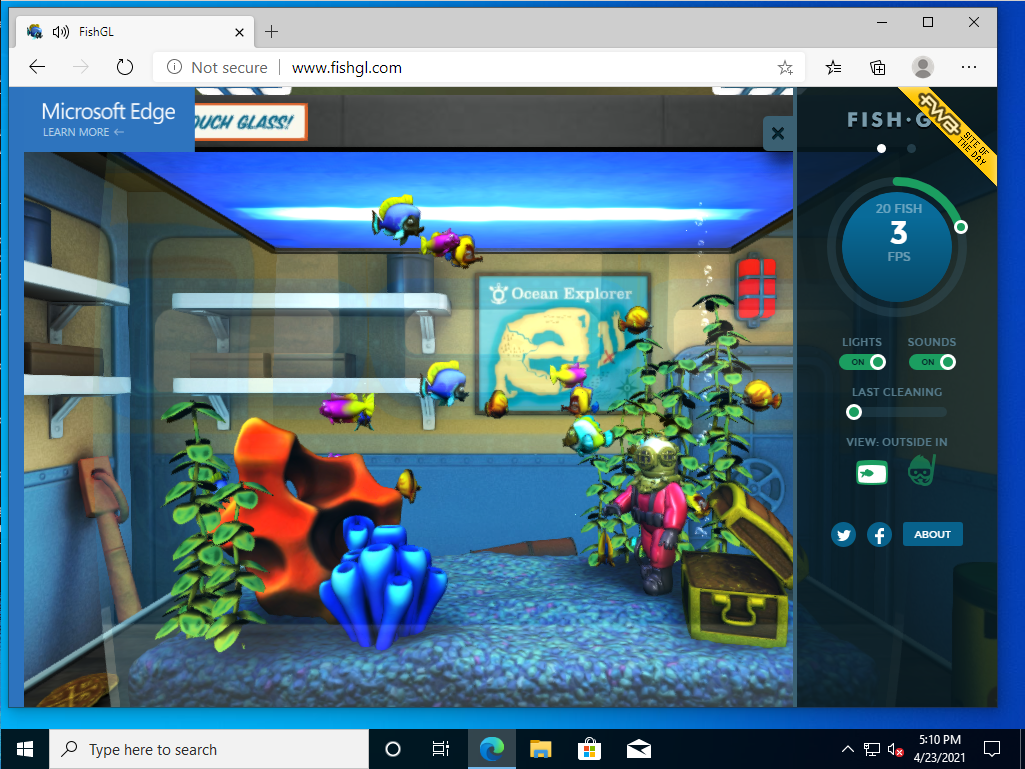
Try testing out the GPU acceleration. Open a web browser in your VM and navigate to “https://webglsamples.org/fishtank/fishtank.html” HOWEVER don’t be surprised by the poor performance. The default kubevirt console does not take advantage of the GPU. For that we need to take one final step to use the Windows Remote Desktop Protocol (RDP) which can use the GPU.
Using the GPU
In order to take advantage of the virtual GPU we have added, we will need to connect to the virtual machine over Remote Desktop Protocol (RDP). Follow these steps to enable RDP:
- In the Windows 10 search bar, type “Remote Desktop Settings” and then open the result.
- Select “Enable Remote Desktop” and confirm the change.
- Select “Advanced settings” and un-check “Require computers to use Network level Authentication”, and confirm this change.
- Finally reboot the Windows 10 Virtual machine.
Now, run the following commands in order to expose the RDP server to outside your Kubernetes cluster:
$ virtctl expose vm win10vm1 --port=3389 --type=NodePort --name=win10vm1-rdp
$ kubectl get svc
NAME           TYPE        CLUSTER-IP       EXTERNAL-IP   PORT(S)          AGE
kubernetes     ClusterIP   10.96.0.1        <none>        443/TCP          18h
win10vm1-rdp   NodePort    10.105.159.184   <none>        3389:30627/TCP   39s
Note the port that was assigned to this service we will use it in the next step. In the above output the port is 30627.
We can now use the rdesktop tool to connect to our VM and get the full advantages of the vGPU. From a command line run rdesktop localhost:<port> being sure to update the port based on the output from above. When prompted by rdesktop accept the certificate. Log into your Windows 10 client. You can now test out the vGPU.
Let’s try FishGL again. Open a browser and go to https://webglsamples.org/fishtank/fishtank.html. You should notice a large improvement in the applications performance. You can also open the Task Manager and look at the performance tab to see the GPU under load.
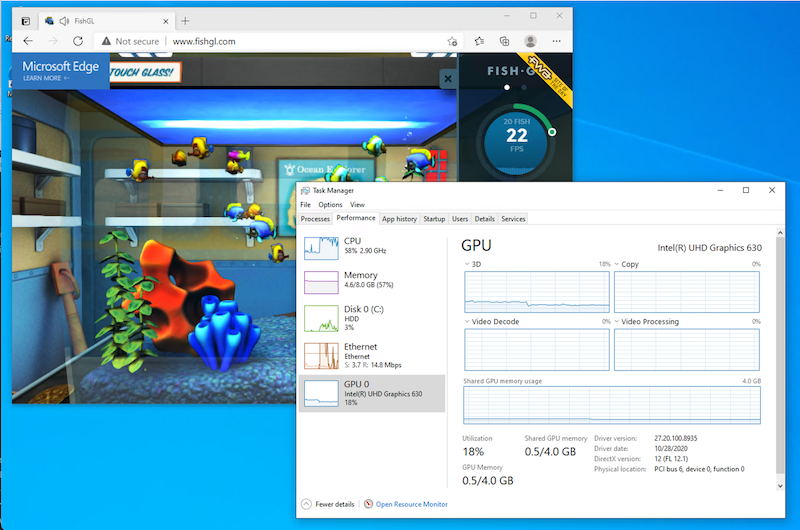
Note that since you are running your Fedora 32 workstation on this same GPU you are already sharing the graphics workload between your primary desktop, and the virtualized Windows Desktop also running on this machine.
Congratulations! You now have a VM running in Kubernetes using an Intel vGPU. If your test machine has enough resources you can repeat the steps and create multiple virtual machines all sharing the one Intel GPU.